
When installing hardwood flooring, the two primary methods are nail-down and glue-down. Each approach has its strengths and is suited for specific flooring types, subfloors, and environments.
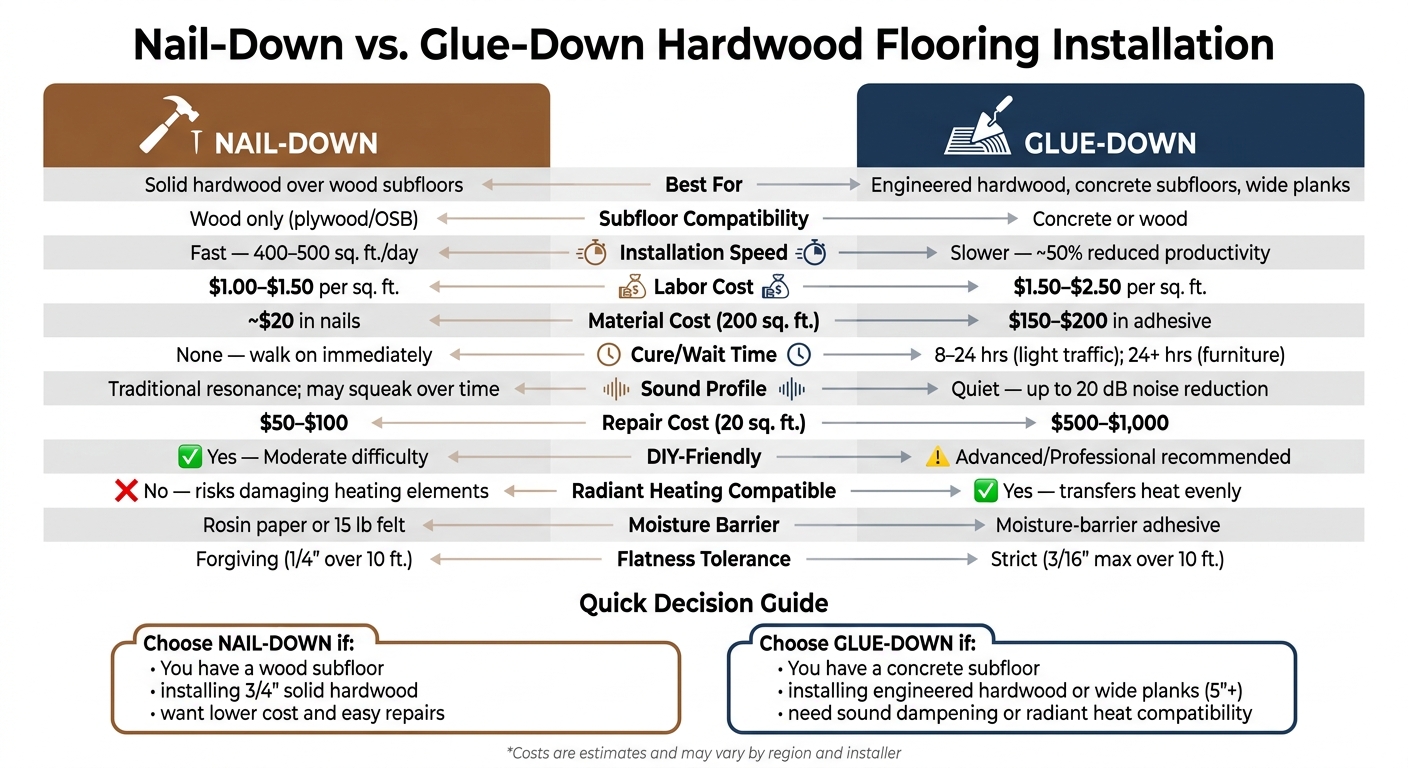
- Nail-Down: Best for solid hardwood over wood subfloors (like plywood or OSB). It’s faster, more affordable, and easier to repair. However, it’s not suitable for concrete subfloors or areas with high moisture.
- Glue-Down: Ideal for engineered hardwood, concrete subfloors, and wide planks. It offers better soundproofing and stability but is slower, more expensive, and harder to repair.
Key Differences:
- Speed: Nail-down is quicker; glue-down requires curing time (8–48 hours).
- Cost: Nail-down is cheaper ($1.00–$1.50 per sq. ft. labor) vs. glue-down ($1.50–$2.50 per sq. ft. labor).
- Subfloor Compatibility: Nail-down works only on wood; glue-down works on both concrete and wood.
- Maintenance: Nail-down is easier and cheaper to repair. Glue-down is more durable but costly to fix.
- Sound: Glue-down reduces noise better than nail-down.
Quick Comparison:
| Factor | Nail-Down | Glue-Down |
|---|---|---|
| Subfloor Type | Wood (plywood/OSB) only | Concrete or wood |
| Installation Speed | Fast | Slower; requires curing time |
| Labor Cost | $1.00–$1.50 per sq. ft. | $1.50–$2.50 per sq. ft. |
| Repair Cost | $50–$100 (20 sq. ft.) | $500–$1,000 (20 sq. ft.) |
| Sound Profile | May squeak over time | Quieter, up to 20 dB reduction |
Each method has specific use cases, so consider your flooring type, subfloor, and long-term needs before deciding.
Nail-Down vs. Glue-Down Hardwood Flooring: Full Comparison
Nail-Down Installation
What Is Nail-Down Installation?
Nail-down installation secures hardwood planks to a wood subfloor using metal cleats or staples. A pneumatic flooring nailer drives these fasteners at an angle through the tongue of each plank – a process called blind-nailing. This method keeps the fasteners hidden once the next board is installed, creating a smooth, seamless look. One of the key benefits of this technique is its ability to hold the planks firmly in place while still allowing for natural expansion and contraction due to seasonal humidity changes. This flexibility helps reduce stress on the wood over time.
Subfloor Requirements for Nail-Down
Nail-down installation is only suitable for wood-based subfloors like plywood or OSB (oriented strand board). The subfloor must be flat within 1/4 inch over a 10-foot span and meet specific thickness standards:
- 5/8-inch plywood or 23/32-inch OSB for joists spaced 16 inches apart.
- 7/8-inch plywood or 1-inch OSB for joists spaced over 19.2 inches.
"Your final installation is only as good as the subfloor you’re installing over." – Catherine Liewen
Plywood is often preferred because it holds fasteners better and resists moisture-related swelling more effectively than OSB. OSB can expand at its edges if exposed to moisture, which may loosen fasteners and compromise the installation.
When to Use Nail-Down Installation
This method is ideal for installing 3/4-inch solid hardwood on wood subfloors, making it a popular choice for above-grade spaces like main living areas or upper floors. However, it’s not suitable for basements or areas with concrete slabs, where alternative methods are required. For planks wider than 5 inches, combining nails with adhesive (a glue-assist method) is often recommended to minimize issues like cupping and gapping. Narrower boards, on the other hand, typically perform well with nails alone.
Now, let’s look at the tools and materials you’ll need for a successful nail-down installation.
Tools and Materials for Nail-Down Installation
Here’s a quick rundown of the essential tools and materials:
| Tool / Material | Purpose |
|---|---|
| Pneumatic Flooring Nailer/Stapler | Drives cleats or staples at the correct angle through the tongue |
| Flooring Cleats (1.5"–2") | Secures the hardwood to the subfloor |
| Air Compressor & Hose | Powers the pneumatic nailer |
| Rubber Mallet | Helps fit planks tightly and assists with nailer operation |
| Underlayment (Rosin or 15 lb Felt Paper) | Reduces friction between the subfloor and hardwood while acting as a moisture barrier |
| Spacers | Maintains a 3/4-inch expansion gap around the room’s edges |
Fasteners should be spaced every 8 to 10 inches along each plank for a secure fit. For areas where the pneumatic nailer can’t reach – such as the first and last rows near walls – installers use face-nailing. This involves driving nails through the top surface of the planks and filling the holes with matching wood putty for a polished finish.
sbb-itb-9f8f869
Glue-Down Installation
What Is Glue-Down Installation?
Glue-down installation secures flooring planks directly to the subfloor using a full layer of adhesive. Unlike nail-down methods, this approach doesn’t involve mechanical fasteners. Instead, adhesive is applied across the entire back surface of each plank, creating a monolithic unit once it cures. This method minimizes plank movement, resulting in a dense, stable floor that feels solid underfoot. Plus, without nails, there’s no risk of fastener noise, making the floor quieter and more rigid.
Subfloor Requirements for Glue-Down
Glue-down installation can be done on both concrete slabs and wood subfloors like plywood or OSB. However, the subfloor must meet specific conditions: it needs to be clean, dry, and perfectly flat. This method demands more precise preparation than nail-down installation, with flatness tolerances of no more than 3/16 inch over 10 feet.
Concrete slabs, in particular, require extra care. They should have a compressive strength of at least 3,000 psi and must cure for a minimum of 60 days before installation. Any residual paint, wax, or sealant can interfere with the adhesive’s bond, so scraping or grinding the surface is necessary.
"Having a clean, effective glue-down system can make all the difference… people notice when you’re efficient and tidy with your adhesive." – Conrad Mark, Owner, Wood Floor Business
Before installation, always conduct a calcium-chloride or relative humidity test to check moisture levels in the concrete, even if it seems dry. Applying a liquid moisture barrier or vapor retarder over the slab adds an extra layer of protection. With proper subfloor preparation, glue-down installation becomes an excellent option for many flooring projects.
When to Use Glue-Down Installation
Glue-down installation is a go-to method for spaces like concrete slabs, basements, ground floors, and commercial spaces. It’s especially effective for engineered hardwood and intricate parquet patterns (such as herringbone or chevron), where a stable base is crucial. Additionally, this method excels in projects with radiant heating systems, as it accommodates temperature changes without loosening the planks.
Tools and Materials for Glue-Down Installation
Having the right tools and materials on hand is essential for a smooth glue-down installation. Here’s what you’ll need:
| Tool / Material | Purpose |
|---|---|
| Flooring Adhesive (urethane or silane-based) | Bonds the planks to the subfloor |
| Notched Trowel (1/4" x 1/4" or 3/16" x 5/32") | Ensures even adhesive application |
| 100-lb Floor Roller | Strengthens the bond by pressing planks firmly into the adhesive |
| Tapping Block & Rubber Mallet | Snugs planks together without causing damage |
| Pull Bar | Helps tighten planks near walls |
| Chalk Line & Laser Level | Keeps rows aligned and organized |
| Moisture Meter | Verifies acceptable moisture levels in the wood and subfloor |
| Mineral Spirits / Glue Wipes | Cleans adhesive spills during installation |
To ensure the adhesive doesn’t set too quickly, work in small sections – spreading glue about 2 feet at a time. Use blue painter’s tape to hold planks in place as the adhesive cures, and insert wedges made from scrap wood to maintain a consistent 3/4-inch expansion gap along walls. This prevents shifting while the adhesive sets.
Nails vs. Glue: Side-by-Side Comparison
Installation Speed and Labor
When comparing the two methods, nail-down installation clearly takes the lead in terms of speed. A professional installer can cover about 400–500 square feet in a single day. On the other hand, glue-down installation slows things down significantly, cutting productivity nearly in half. The process of spreading adhesive in small sections, working within a 20–30 minute window before it sets, and allowing time for the floor to cure makes glue-down more time-intensive.
For DIY enthusiasts, nailing is often the preferred choice. Adhesive application requires precise trowel work and meticulous cleanup, which can be tricky for beginners.
Material and Labor Costs
Nail-down installation is generally more affordable upfront. Labor costs for nail-down range between $1.00 and $1.50 per square foot, whereas glue-down labor costs are slightly higher, at $1.50–$2.50 per square foot. Material costs add to this difference: nails for a 200-square-foot room cost around $20, while a 5-gallon bucket of quality adhesive for the same area is priced at $150–$200.
"Purely on materials, a glue-down install can cost significantly more per square foot than a nail-down." – Weles Team
When factoring in tools and supplies, the total cost for a 200-square-foot nail-down project is approximately $300–$500. In comparison, glue-down installations for the same space typically range from $600–$800. However, if a concrete subfloor requires the addition of a plywood base for nailing, the cost difference between the two methods can narrow.
Sound, Stability, and Long-Term Performance
Glue-down flooring has the edge when it comes to sound dampening. The adhesive layer can reduce impact noise by as much as 20 decibels, which makes it a quieter option. This quieter, more stable feel underfoot is ideal for homeowners looking for a dense and solid surface with minimal bounce or hollow spots.
Nail-down floors, on the other hand, offer a more traditional feel with a slight resonance. They also allow wood to naturally expand and contract with seasonal changes. However, over time, nails can loosen, leading to squeaks. Glue-down floors tend to require less maintenance over the years, potentially saving up to 15% in upkeep costs over two decades due to their durability and resistance to wear.
Maintenance and Repair
When it comes to repairs, nail-down flooring is the more economical and straightforward option. Replacing a 20-square-foot section of a nailed floor typically costs between $50 and $100 in labor and materials. Individual boards can be easily removed and replaced. In contrast, repairing a glued floor is far more labor-intensive and expensive, often costing $500–$1,000. This is because removing planks bonded with adhesive can damage nearby boards or even the subfloor.
"Nailing is generally more cost-effective and easier to repair, gluing offers better soundproofing and can be more suitable for engineered wood." – Caleb Foster
If future access to the subfloor is a possibility – for plumbing, wiring, or renovations – the nail-down method provides greater flexibility. Glue-down, however, is better for those seeking a longer-term, more permanent solution.
Comparison Table: Nails vs. Glue
| Factor | Nail-Down | Glue-Down |
|---|---|---|
| Installation Speed | Fast; 400–500 sq. ft./day | Slower; productivity reduced by ~50% |
| Labor Cost | $1.00–$1.50 per sq. ft. | $1.50–$2.50 per sq. ft. |
| Material Cost (200 sq. ft.) | ~$20 in nails | $150–$200 in adhesive |
| Cure/Wait Time | None; available immediately | 8–48 hours before heavy traffic |
| Sound Profile | Traditional resonance; may squeak over time | Quiet; up to 20 dB noise reduction |
| Stability | Allows natural wood movement | Minimizes gapping and cupping |
| Subfloor Compatibility | Wood only (plywood/OSB) | Concrete or wood |
| Repair Cost (20 sq. ft.) | $50–$100 | $500–$1,000 |
| DIY-Friendly | Yes | Advanced/Professional recommended |
Key Differences Between Nailing, Stapling, Or Gluing Down Flooring?
Choosing the Right Method for Your Project
Picking the right installation method for hardwood flooring means weighing factors like the type of hardwood, the subfloor’s characteristics, and the local environment.
Solid Hardwood vs. Engineered Hardwood
The type of hardwood you choose plays a big role in determining the best installation method. Solid hardwood, which is usually ¾ inch thick, works best with nail-down installation. Its dense, sturdy planks can handle fasteners without splitting, and the connection created by nails is built to last for decades.
"Nail-down installation is ideal for solid hardwood flooring, providing a strong and durable connection to the subfloor." – Ambassador Floor
On the other hand, engineered hardwood is more versatile. Thinner boards or those with a delicate wear layer may not hold up well to nails, making glue-down installation the better option for ensuring long-term durability. Some engineered hardwoods, especially wide planks, even come with warranties that require glue-down installation. Skipping this step could void your coverage.
Once you’ve chosen your hardwood, the next step is to consider your subfloor and environmental conditions to finalize the installation method.
Subfloor Type and Environmental Factors
Your subfloor often dictates your installation options. For example, concrete subfloors can’t hold nails or staples, so glue-down installation is your only choice. Meanwhile, wood subfloors are compatible with both nail-down and glue-down methods, though nail-down is the traditional choice for solid hardwood.
The width of the planks is another important consideration. Boards wider than 5 inches are more likely to experience cupping or seasonal gaps. In these cases, a full glue-down method – or at least a glue-assist (nails combined with adhesive) – is highly recommended. Similarly, hardwood thinner than ⅝ inch should be glued down to avoid splitting or weak fastener connections.
If your home features radiant in-floor heating, glue-down installation is the safest and most efficient method. Nailing into a radiant system risks damaging the heating elements, while adhesive helps transfer heat more evenly through the flooring.
Recommendations for Atlanta Homeowners and Business Owners
For homeowners and businesses in Atlanta, local climate conditions add another layer to the decision-making process. Atlanta’s humidity fluctuations can impact hardwood performance. Modern adhesives, which remain elastic after curing, allow the wood to expand and contract naturally without stressing the fasteners or causing the boards to come loose.
"Glue-down provides superior dimensional stability, minimizing the expansion and contraction that can lead to gaps or compression crowning." – Wooden Flooring Experts
For residents with plywood subfloors, a glue-assist method (nails with adhesive) offers the best of both worlds: strength and stability. This is especially helpful for wide-plank floors in rooms that experience seasonal humidity changes. For spaces with concrete slabs, such as basements, ground-level additions, or commercial areas, a glue-down approach using a moisture-barrier urethane adhesive is the way to go. This prevents vapor from affecting the wood.
TriArt Hardwoods provides in-home consultations to evaluate your subfloor, hardwood type, and room conditions, helping you choose the most suitable installation method for your specific needs.
Preparation and Workflow: What to Expect with Each Method
When it comes to installing hardwood flooring, preparation is just as crucial as the installation itself. Skimping on this step can lead to issues like warping, gaps, or even complete flooring failure down the line.
Subfloor Prep, Moisture Testing, and Acclimation
Regardless of the method you choose, proper acclimation of the hardwood is non-negotiable. Allow the wood to adjust to the room’s moisture levels for several days before installation to avoid problems like buckling or gaps.
Both methods also require a flat subfloor. For glue-down installations, the surface must be extremely precise, with no more than a 3/16-inch deviation over 10 feet. High spots should be sanded down, and low spots filled. Nail-down installations are a bit more forgiving of minor imperfections, but achieving a flat surface is still the goal.
Moisture testing is another critical step. For glue-down installations over wood subfloors, the moisture content should not exceed 4%. Nail-down installations rely on rosin paper or 15 lb felt as a moisture barrier, while glue-down systems require moisture-barrier adhesives.
"A full-spread glue with a moisture-barrier adhesive can seal the floor from any vapor coming through a concrete slab, making it a safer choice for below-grade." – Weles Team
Once acclimation and moisture testing are complete, it’s time to consider how quickly each method allows for use.
Ready to Walk On: Nail-Down vs. Cure Time for Glue-Down
One of the biggest differences between the two methods is usability after installation. Nail-down floors are ready to walk on immediately after they’re installed. Glue-down, on the other hand, requires an 8–24-hour curing period for light foot traffic and at least 24 hours before moving in heavy furniture. High humidity can extend this timeline even further.
For example, installing a 500-square-foot room with the glue-down method could add 24 to 48 hours to the project compared to nail-down.
"Glue-down installations need time to set; you might have to wait 24 hours or more before moving furniture in or heavy traffic, to ensure the adhesive has hardened." – Weles Team
If you’re on a tight schedule, such as planning around a move-in date or furniture delivery, this curing time is something you’ll need to factor in.
Limitations and Prerequisites for Each Method
Each method comes with specific requirements. Nail-down installations are only suitable for wood subfloors, such as plywood or OSB. If your subfloor is concrete, nailing isn’t an option. Glue-down, however, works on both concrete and wood, making it the more adaptable choice for various subfloor types.
Glue-down installations require a completely clean subfloor – free of adhesive residue, dust, or oil. Since the adhesive sets quickly (within 20–30 minutes), you’ll need to work in small sections of 10–20 square feet at a time. This makes glue-down installations more labor-intensive, which is why professional installers often charge $1.00 to $2.50 more per square foot for this method compared to nail-down.
Understanding these preparation steps and limitations is key to determining which method aligns better with your project needs.
| Factor | Nail-Down | Glue-Down |
|---|---|---|
| Subfloor Type | Wood only (plywood/OSB) | Concrete or wood |
| Flatness Tolerance | More forgiving | 3/16" max over 10 ft. |
| Moisture Barrier | Rosin paper or 15 lb felt | Moisture-barrier adhesive |
| Ready to Use | Immediately | 8–24 hrs (light); 24+ hrs (furniture) |
| DIY Difficulty | Moderate | High; messy and time-sensitive |
Conclusion: Picking the Right Installation Method
There’s no one-size-fits-all answer when it comes to choosing between nails or glue for your hardwood flooring. It all depends on your unique situation. As Wooden Flooring Experts explain:
"The ‘better’ method is the one that aligns with your specific substrate, your chosen flooring product’s manufacturer requirements, and your long-term performance expectations." – Wooden Flooring Experts
For example, if you’re installing 3/4" solid hardwood over a plywood subfloor, the nail-down method tends to be more affordable and easier to repair. On the other hand, if you’re dealing with concrete subfloors, engineered hardwood, or areas prone to moisture, glue-down provides the stability and moisture resistance you need. For wide planks over 5 inches, a glue-assist approach is often recommended to avoid issues like cupping or squeaking.
When deciding, don’t just weigh factors like speed, cost, and durability – take a close look at the manufacturer’s warranty. Many engineered hardwood warranties are only valid if the flooring is glued down, especially for wide-plank styles. Always double-check these details before settling on the best installation method for your project.
FAQs
Can I nail down hardwood over concrete?
No, you generally can’t nail hardwood directly onto concrete. Doing so can damage the concrete and compromise the flooring. Instead, it’s better to explore other installation methods, like glue-down installation or floating floors. These approaches are more compatible with concrete subfloors and provide better stability and longevity. Avoid nailing directly into concrete to ensure a proper and durable hardwood floor installation.
Do I need a moisture barrier for glue-down floors?
Yes, it’s a good idea to use a moisture barrier when installing glue-down floors, especially if you’re working over concrete or in areas prone to moisture. This barrier helps block moisture from seeping through, ensuring the adhesive bonds properly and protecting your flooring from potential damage.
Which method is best for wide-plank hardwood?
For wide-plank hardwood flooring, particularly boards that exceed 5 inches in width, using both glue and nails is often suggested. The glue adds extra stability, reducing the risk of cupping and movement, while nails or staples keep the planks firmly secured. This dual method is especially effective in regions with seasonal humidity fluctuations, as it helps the wide planks handle natural expansion and contraction, ensuring they last over time.


