
Installing hardwood floors can be tricky, but avoiding a few common mistakes can save you time, money, and frustration. Here’s what you need to watch out for:
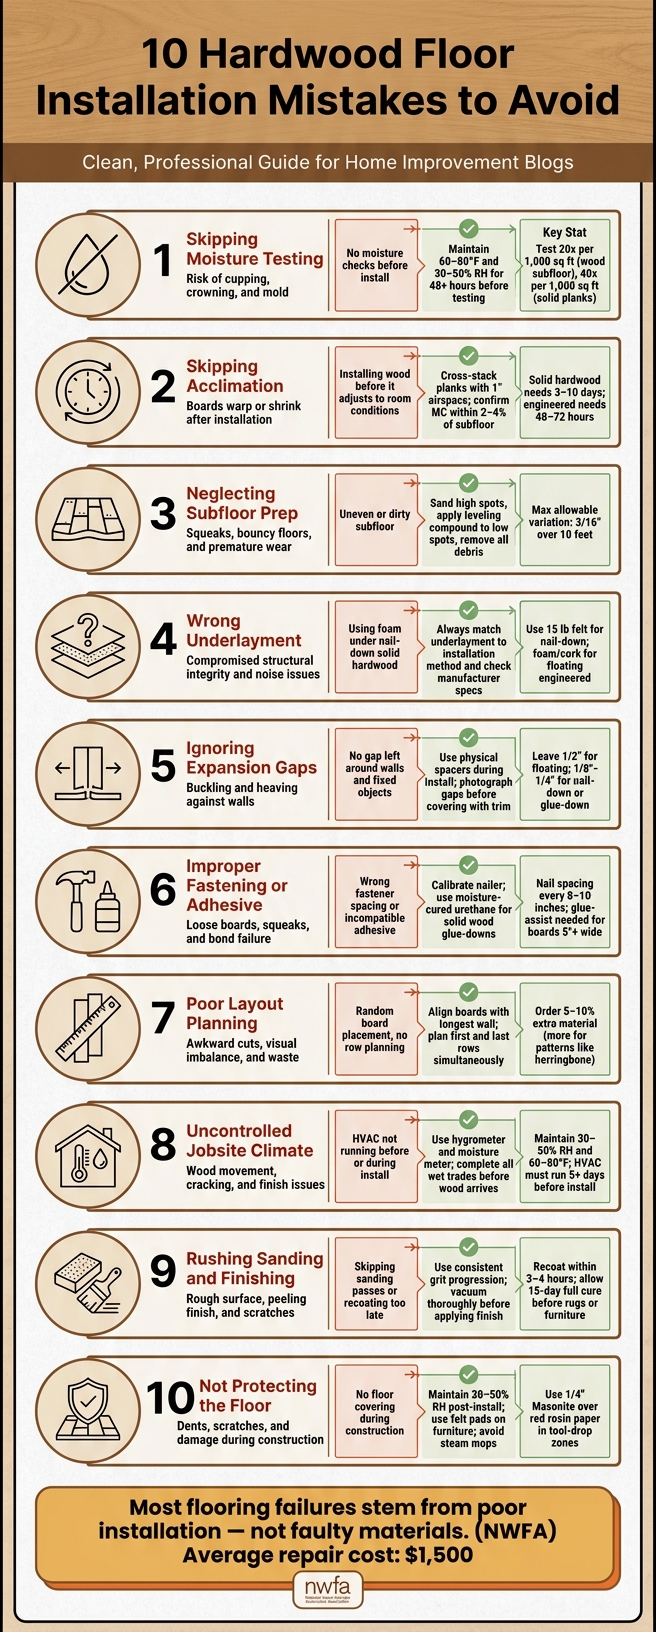
- Skipping Moisture Testing: Not testing moisture levels in the subfloor, wood, or air can lead to warping, cupping, or buckling.
- Skipping Acclimation: Failing to let wood adjust to the room’s conditions can cause gaps or structural issues.
- Neglecting Subfloor Prep: Uneven or dirty subfloors lead to squeaking, gaps, or unstable flooring.
- Wrong Underlayment: Using the incorrect material can compromise stability and void warranties.
- Ignoring Expansion Gaps: Without gaps, wood can buckle or tent as it expands.
- Improper Fastening or Adhesive: Misusing nails or glue can cause loose boards or failure.
- Poor Layout Planning: Random board placement and bad alignment ruin the floor’s look and durability.
- Uncontrolled Climate: Inconsistent humidity and temperature can damage wood.
- Rushing Sanding and Finishing: Skipping steps or rushing through can result in uneven finishes or peeling.
- Not Protecting the Floor: Failing to shield the floor during and after installation can lead to damage.
Key takeaway: Proper preparation, climate control, and attention to detail are essential for a long-lasting, beautiful hardwood floor. Skipping steps or rushing the process can lead to costly repairs, like the $1,500 mistake mentioned in a real-life example.
For Atlanta homeowners, TriArt Hardwoods offers professional installation and repair services tailored to humid climates.
10 Hardwood Floor Installation Mistakes to Avoid
What not to do when installing hardwood flooring
sbb-itb-9f8f869
1. Skipping Moisture And Humidity Testing
Wood is a hygroscopic material, meaning it absorbs and releases moisture depending on the surrounding environment. This natural behavior causes wood to swell when it absorbs moisture and shrink when it dries out. Installing hardwood floors without testing moisture levels first is a gamble that can lead to expensive repairs down the line.
"Moisture (or sometimes the lack of it) is indisputably the No. 1 cause of wood flooring problems." – Kim Wahlgren, Editor, Wood Floor Business
Skipping proper moisture and humidity testing can result in serious issues like cupping (edges higher than the center), crowning (center higher than edges), buckling, squeaking, and adhesive failure when installed over concrete slabs. These aren’t just aesthetic flaws – they’re structural problems that often require a full replacement of the floor.
Before installation, you need to test three critical areas:
- Ambient air conditions
- Wood planks
- Subfloor
The recommended job-site conditions are 60–80°F with a relative humidity (RH) of 30% to 50%. It’s crucial to maintain these conditions for at least 48 hours before conducting any tests.
For wood subfloors, the National Wood Flooring Association (NWFA) advises performing 20 moisture tests per 1,000 sq. ft., while solid wood flooring planks require 40 moisture content (MC) readings per 1,000 sq. ft.. The moisture difference between the subfloor and the flooring should not exceed 4% for strip flooring (under 3 inches wide) or 2% for plank flooring (3 inches or wider). If these thresholds are exceeded, it’s a clear sign to delay the installation.
Document every test result. Take photos of your meter readings and log the environmental conditions at each test point. Certified wood flooring inspector Timothy McCool emphasizes the importance of record-keeping:
"Without documentation, it’s like not having done the test at all."
Failing to document your results not only increases the risk of moisture-related failures but also leaves you without legal protection in case issues arise later.
Once moisture testing is complete, the next step is acclimating the hardwood planks to the environment. Proper preparation ensures a stable and long-lasting floor.
2. Failing To Acclimate Hardwood Planks
Even when moisture testing is done correctly, skipping or rushing the acclimation process can lead to major issues. Acclimation allows hardwood planks to adjust to the room’s conditions until they reach Equilibrium Moisture Content (EMC). If this step is ignored, the wood may continue expanding or contracting after installation, which can cause significant damage.
The results? Gaps, cupping (curling edges), or buckling (lifting off the subfloor). Beyond the physical damage, skipping acclimation can void the manufacturer’s warranty, as most companies require documented proof of this step for coverage.
"Acclimation is really about moisture balance, not just temperature. Wood responds to the water content in the air long before it reacts to heat or cold. When flooring is installed before that balance is reached, the wood continues adjusting after installation." – Travis Bjorkman, Principal Scientist for Wood, AHF
The time needed for acclimation depends on the type of wood. Solid hardwood typically requires 3–10 days under normal living conditions (60–80°F, 30–50% relative humidity). However, exotic or tropical species may need up to 14 days because their resins and oils slow down moisture exchange. Engineered hardwood, being more stable, usually needs only 48–72 hours.
The method is just as important as the timeline. To ensure proper acclimation:
- Run the HVAC system for at least 5 days before the wood arrives to stabilize the room’s climate.
- Open all packaging – wood sealed in boxes or plastic wrap cannot acclimate.
- Cross-stack the planks in small piles with at least 1 inch of space between boards and elevate them off the subfloor for airflow.
- Use a moisture meter to confirm the wood’s moisture content is within 2% of the subfloor for wide planks (3 inches or more) or within 3–4% for narrower strips before proceeding with installation.
"Time alone does not determine acclimation. Moisture content does. Until readings stabilize, acclimation has not occurred." – Travis Bjorkman, Principal Scientist for Wood, AHF
Once the planks are properly acclimated, the next step is ensuring the subfloor is prepared with precision.
3. Neglecting Subfloor Preparation
Once the acclimation process is complete, the next critical step is preparing the subfloor with care before installing the first board. Just like moisture testing, the condition of the subfloor plays a crucial role in ensuring a stable and sound flooring system. Skipping or rushing this step is a common reason why installations fail. As Keith Long, Owner of Wood Floor Business, explains:
"Laying wood floors is one thing; the condition of the subfloor is another… subfloor preparation has a large bearing on the finished product."
Proper preparation of the subfloor creates the foundation for a smooth installation and ensures the floor remains stable over time.
If the subfloor isn’t prepared correctly, it can lead to a cascade of issues. High spots create pressure points that wear down the finish prematurely, while low spots cause the floor to flex and bounce underfoot. This constant movement weakens tongue-and-groove joints, eventually resulting in visible gaps. Loose subfloor panels, even if they seem stable initially, can lead to persistent squeaking and popping noises.
The industry standard for flatness specifies no more than a 3/16-inch variation over a 10-foot span. To check this, use a long straightedge or level and drag it across the room. If you find high spots, sand them down using 36-grit sandpaper. For low spots, apply a self-leveling compound. Alternatively, for nail-down installations, use shims instead, as cured leveling compounds can’t hold fasteners.
Clear the subfloor by removing any old staples, nails, or adhesive residue. Leftover debris can prevent planks from sitting flush or even damage the wood. Once the surface is clean and level, confirm that the subfloor’s moisture content is below 12% to avoid long-term complications. For strip flooring, the moisture content difference between the hardwood and the subfloor should not exceed 4%, while for plank flooring, the difference should stay within 2%. Finally, vacuum the entire area thoroughly. Even fine dust particles can interfere with adhesive bonding or cause grinding noises when the floor is in use. Taking these steps ensures a trouble-free installation and contributes to the floor’s longevity.
"A subfloor that moves will be a wood floor that moves, and we all know floor movement is what causes noisy floors." – Keith Long, Owner, Wood Floor Business
| Subfloor Issue | Potential Consequence | Corrective Action |
|---|---|---|
| High Spots/Peaks | Accelerated finish wear, crowning | Sand or grind down the peak |
| Low Spots/Valleys | Floor bounce, joint separation, noise | Apply leveling compound or use shims |
| Loose Panels | Persistent squeaking and popping | Screw panels securely into floor joists |
| Debris (Nails/Staples) | Planks won’t sit flush; potential wood damage | Remove all old fasteners manually |
| Dust and Grit | Poor adhesive bond or grinding noises | Vacuum the entire surface thoroughly |
4. Using The Wrong Underlayment Or Moisture Barrier
Once your subfloor is prepped, the next step is crucial: choosing the right underlayment. This layer isn’t just a throwaway addition – it provides moisture protection, reduces noise, adds comfort, helps with slight leveling, and even offers thermal insulation. Picking the wrong material here can mess with your floor’s stability and longevity.
The golden rule? Match the underlayment to your installation method. For nail-down solid hardwood, go with 15 lb asphalt-saturated felt paper. It’s thin and firm, allowing fasteners to hold securely without interference. Using something like thick foam underlayment here is a big no-no – it compresses under nails and destabilizes the floor. On the other hand, for floating engineered planks, foam or cork is a better choice. These materials cushion the floor and accommodate the natural movement of wood during seasonal changes. Just like moisture testing and subfloor prep, selecting the right underlayment is key to avoiding long-term problems.
If you’re working with concrete slabs, remember that even a dry-feeling slab constantly emits moisture. Here’s a helpful insight:
"Even a newly poured slab can emit 8 to 10 pounds of moisture per 1,000 square feet per day. And in older homes, slabs are often unsealed. If you don’t put a barrier down, you’re just inviting problems."
For slab-on-grade installations, a 6 mil poly sheet is your best bet. Overlap seams by at least 12 inches, seal them with moisture-resistant tape, and run the barrier about 2 inches up the walls behind the baseboards. However, if you’re working with wood subfloors above grade, skip the full vapor barrier. Trapping moisture inside a wood subfloor can lead to rot and mold. Instead, go for a semi-permeable material like felt or cork, which allows the floor to breathe.
Common mistakes? Using carpet padding, which is too soft and compromises joint stability, or layering multiple underlayments, which creates excessive give. Stick to one layer – and make sure it’s the right one. Always check the flooring manufacturer’s specifications, too. Using an unapproved underlayment can void your warranty.
| Underlayment Type | Best Use Case | Moisture Protection | Sound Insulation |
|---|---|---|---|
| Felt Paper (15 lb) | Nail-down solid hardwood | Good (moisture retarder) | Minimal |
| Rosin Paper | Above-grade wood subfloors | None | Minimal |
| Foam | Floating engineered floors | Excellent (if vapor layer attached) | Moderate |
| Cork | Sound-sensitive areas (condos) | None (requires separate poly) | High |
| Rubber | High-rise apartments/studios | Naturally moisture-proof | Maximum |
5. Ignoring Expansion Gaps And Wood Movement
Even after carefully preparing the subfloor and choosing the right underlayment, managing wood movement is just as important. Hardwood flooring, no matter how well milled, is constantly reacting to its environment. It absorbs and releases moisture from the air, which leads to expansion and contraction. This natural movement mainly occurs across the width of the boards (cross-grain), not along their length. If there isn’t enough room for this expansion, the flooring can buckle, tent, or develop squeaks when walked on.
"When an irresistible force meets an immovable object, in this case you get floor buckling." – Ecnerwal, Top Contributor, Stack Exchange
The solution? Always leave an expansion gap around every fixed vertical surface, including walls, cabinets, door jambs, and columns. The size of this gap depends on the installation method:
- For floating engineered hardwood, leave 1/2" of clearance.
- For nail-down or glue-down solid hardwood, leave at least 1/8" to 1/4".
These gaps will later be covered by baseboards or shoe molding, but it’s essential to ensure the trim is attached to the wall and not the floor. This allows the floor to move freely underneath without restriction.
In larger spaces, like rooms with continuous runs over 40 feet in length or 25 feet in width, additional expansion breaks are necessary. Using T-moldings in these areas helps manage the cumulative pressure from the flooring’s movement. During installation, physical spacers should be placed against every wall to maintain the required gaps while the planks are being interlocked. Skipping this step, especially in large open spaces, often leads to mid-room buckling – far from any visible wall.
Here are a few practical tips to keep in mind:
- Undercut door jambs instead of notching the flooring. This allows the planks to slide underneath smoothly.
- If you’re installing during a dry winter season, consider using "washer rows" – placing washers temporarily between rows to create extra space for when humidity increases in the summer months.
"Expansion gaps aren’t optional – they’re insurance. They protect your reputation, your margins, and your callbacks." – BuildDirect
One final piece of advice: photograph your expansion gaps before covering them with trim. These photos can serve as proof that the installation was done correctly, which is invaluable if a warranty claim ever arises. With this step complete, it’s time to focus on fastening and adhesive methods for a flawless finish.
6. Using Wrong Fastening Or Adhesive Methods
After ensuring proper expansion gaps, securing the boards to the subfloor becomes a critical step. Whether you’re using the nail-down or glue-down method, following the right techniques is essential to avoid loose boards, squeaks, or even costly repairs.
For nail-down installations, these are best suited for wood subfloors like plywood or OSB. Fasteners should be spaced every 8 to 10 inches along each board. Too few fasteners can lead to shifting and squeaking, while overusing them risks splitting the wood. Choosing the wrong cleat or staple gauge can also cause surface dimpling or weaken the structure. Additionally, an uncalibrated nailer can misplace fasteners, creating further issues. Before starting, check that the subfloor is flat within 3/16" over 10 feet and free of debris. These steps are essential for a secure installation.
Skipping these precautions during a DIY nail-down project can result in boards that wobble and make loud popping noises.
"The NWFA has very specific standards for installation, moisture content, and finishing. It’s not rocket science, but it’s close enough to ensure your floor will last." – Weles Team
Glue-down installations, on the other hand, come with their own set of challenges. The adhesive must be compatible with the flooring species and thickness. For instance, water-based urethane adhesives, which contain around 18% water, can cause thin solid wood planks to expand and fail. Moisture-cured urethane is a better choice for solid wood. Using a worn trowel notch can lead to uneven adhesive application or premature skinning, weakening the bond. Be sure to clean any adhesive off the board’s surface immediately, as cured adhesive can damage the finish.
"Using non-spec adhesives, fasteners, or tools risks floor failure and voids warranties." – Old Master Products
For boards wider than 5 inches, a glue-assist method – which combines nails with adhesive – helps reduce cupping and seasonal movement. Don’t forget to document adhesive lot numbers and subfloor preparation steps, as this information can be crucial for warranty claims.
7. Poor Layout Planning And Board Selection
Getting the layout and board selection wrong can throw off your entire hardwood flooring project. While proper installation techniques are essential for structural integrity, a well-thought-out layout ensures the floor looks great and performs well over time. A common misstep? Picking boards randomly without a clear strategy.
Board direction makes a difference. To create a balanced and visually pleasing flow, align boards parallel to the longest wall or the main light source in the room. For solid hardwood, install the boards perpendicular to the floor joists to provide better structural support.
Before you even start installing, sort through your planks. Look for noticeable color differences, irregular grain patterns, or edge damage. Reject any boards with visible flaws, and aim to distribute colors and patterns evenly across the floor.
Planning your rows is equally important. To avoid ending up with a narrow, awkward-looking final row, plan your first and last rows at the same time. Don’t forget to include expansion gaps around the perimeter of the room to ensure everything fits properly.
When it comes to materials, always order extra. For a standard rectangular room, plan for 5%–10% more hardwood than the room’s actual square footage. If you’re working with intricate patterns like herringbone, chevron, or diagonal designs, you’ll need even more to account for additional cuts. Be sure to order all your boards in one go from the same production batch. This helps maintain consistency in color, grain, and finish. Save a few extra boards from the original batch for future repairs.
8. Not Controlling Jobsite And Long-Term Climate
Controlling the jobsite climate is just as important as proper moisture testing and acclimation. Without stable indoor conditions, issues like cupping, crowning, buckling, and gaps can develop over time.
To avoid these problems, maintain 30%–50% relative humidity and an indoor temperature between 60°F–80°F. The permanent HVAC system should be running under normal living conditions for at least five days before installation starts. If a permanent HVAC system isn’t ready, temporary heating or dehumidifiers can help achieve and maintain these conditions.
Before the wood is delivered, confirm that all "wet trades" like drywall, painting, and concrete work are completed and fully dry. These processes release moisture into the air, which can disrupt the hardwood’s stability. Never store hardwood flooring in places like garages, exterior patios, or any area that doesn’t replicate the home’s living environment.
Post-installation climate control is equally critical. Seasonal humidity changes can cause the floor to expand during humid summers and shrink in dry winters, leading to crushed edges and permanent gaps. As Travis Bjorkman, Principal Scientist for Wood at AHF, explains:
"Nearly every acclimation failure traces back to one assumption: that the house and the wood were close enough. Your home’s conditions must be ready for the installation. Wood responds to physics, not intentions."
To ensure everything is on track, use a hygrometer to monitor jobsite humidity and a moisture meter to check the wood’s internal moisture content, which should stay between 6% and 9% before and during installation. These tools provide clear, measurable data to guide the process.
With these steps in place, you can move forward with installation, confident in the floor’s long-term durability.
9. Rushing Sanding, Staining, And Finishing
Once your floor is laid and the environment is stable, the next step is crucial for ensuring the floor’s durability: the finishing process. Rushing through sanding, staining, or finishing can seriously impact the floor’s lifespan.
Sanding requires at least four careful passes, each with specific tools. Start with a drum sander for the initial rough cut, use an edger for perimeter areas, follow up with a rotary sander for precision, and finish with an orbital sander to eliminate scratch patterns. Stick to a consistent grit progression. For example, using 220-grit in the main area but 120-grit along the edges will create uneven scratch patterns. These inconsistencies reflect light differently and result in an uneven finish.
After sanding, cleaning is critical. Vacuum thoroughly along the grain, then at a 90-degree angle, and finish with a dry microfiber mop. Any leftover dust can get trapped in the finish, causing texture issues that might require re-sanding the entire floor.
Before applying the finish, check if the stain is fully dry. A simple test: wipe a small area with a clean white towel. If any color transfers, wait longer before proceeding. Brett Miller from Wood Floor Business emphasizes:
"Finish will not properly adhere to stain that hasn’t thoroughly dried."
This issue is especially common with darker stains like ebony or mahogany, as they often leave excess pigment that can cause the finish to peel.
When applying the finish, timing is everything. Recoat within 3–4 hours to ensure proper chemical bonding. If you miss that window, you’ll need to mechanically abrade the floor before adding another coat to avoid peeling. To prevent streaks from airflow, turn off the HVAC system during the application and wait 30–45 minutes after the finish has skinned over before turning it back on. Limit applications to two topcoats per day, and allow the finish to fully cure for 15 days. During this time, avoid placing rugs or furniture on the floor.
Taking these steps carefully ensures a smooth, long-lasting finish that highlights the beauty of your hardwood floor.
10. Not Protecting The Floor During And After Installation
Brand-new hardwood floors are especially prone to damage from construction debris and accidental tool drops. To shield your floors during work, cover the area with ¼-inch Masonite or ½-inch Homasote placed over red rosin paper. While red rosin paper is great for handling everyday foot traffic – thanks to its non-slip, breathable, and cost-effective qualities – it won’t cushion against the impact of dropped tools. Be sure to tape all seams and fold the edges up along baseboards to prevent debris from sneaking underneath.
As The Evil Greebo wisely pointed out:
"Put them [masonite sheets] down anywhere tools may be dropped, since rosin and kraft paper won’t stop the shock of impact from damaging the underlying floor." – The Evil Greebo
Taking these precautions ensures your floor stays intact during the installation process and in the crucial days that follow.
Once the flooring is in place, proper care becomes essential to maintaining its finish. Keep the same indoor climate controls used during installation to protect the floor during its curing phase. Aim to maintain humidity levels between 30% and 50% using a hygrometer. Avoid heavy use for at least 24–48 hours to allow adhesive to set properly. When it’s time to bring furniture back, attach felt pads to the legs to prevent scratching or dents. Rugs should wait a few days before being laid down, and always use non-staining pads to avoid discoloration.
For cleaning, stick to a soft-bristle broom or a vacuum set to hard floor mode. Avoid harsh chemical cleaners and steam mops, as these can damage the floor’s coatings and adhesives.
Comparison Table
Here’s a quick reference to the key variables discussed earlier. These tables break down essential tools, acclimation differences, and solutions for common subfloor issues. Use them to avoid potential installation missteps.
Moisture Testing Tools at a Glance
Different subfloor types call for specific moisture testing tools. For wood, pin meters and pinless meters offer distinct advantages. For concrete slabs, ASTM F2170 and ASTM F1869 remain the go-to methods, each with its own strengths and limitations.
| Tool Type | Ideal For | How It Works | Main Consideration |
|---|---|---|---|
| Pin Meter | Wood flooring and wood subfloors | Measures electrical resistance via pins | Accurate at depth; leaves small holes |
| Pinless Meter | Rapid surface scanning of wood | Uses electromagnetic signals | Non-destructive but sensitive to surface moisture |
| ASTM F2170 (In-Situ Probe) | Concrete slabs | Measures RH inside a drilled hole | Highly accurate; requires drilling and wait time |
| ASTM F1869 (Calcium Chloride) | Concrete slabs | Measures surface moisture vapor emission | Only measures surface moisture; misses deep-slab levels |
Solid vs. Engineered Hardwood: Acclimation Differences
Both solid and engineered hardwood need to adjust to their environment before installation, but they react differently to humidity. Solid hardwood is more sensitive to changes, while engineered hardwood’s layered design offers better stability.
| Factor | Solid Hardwood | Engineered Hardwood |
|---|---|---|
| Stability | Low; prone to cupping, shrinking, and buckling | High; layered structure resists movement |
| Acclimation Time | 3–7 days until moisture content stabilizes | 3–7 days; follow manufacturer guidelines |
| Moisture Risk | High; requires 30–50% RH | Moderate; more forgiving but still needs stable HVAC |
| Ideal Moisture Content | 6%–9%; subfloor within 2%–4% of flooring MC | Same range; fewer issues at extremes |
Common Subfloor Problems and How to Fix Them
As Kim Wahlgren, Editor of Wood Floor Business, advises:
"The industry mantra for subfloors is that they should be clean, flat and dry."
Flatness requirements depend on the installation method. For mechanical fasteners over 1½ inches, the tolerance is ¼ inch in 10 feet. For glue-down or shorter fasteners, it’s 3/16 inch in 10 feet.
| Problem | Subfloor Type | Recommended Fix |
|---|---|---|
| Low Spots | Concrete | Use an approved self-leveling compound |
| Low Spots | Plywood/Wood | Fill with asphalt shingles or thin plywood |
| High Spots | Concrete | Use mechanical grinding |
| High Spots | Plywood/Wood | Sand or plane down the high area |
| Debris/Contaminants | Any | Scrape or grind; abrade slabs with 30-grit sandpaper for glue-down installs |
| Loose Subfloor | Any | Secure to joists with additional screws |
| Inappropriate Material (Particleboard) | Any | Replace with plywood or OSB, or switch to a floating floor system |
Conclusion
Installing hardwood floors successfully comes down to avoiding common mistakes and following best practices. Issues like skipping moisture testing or rushing through the finishing process are entirely preventable. In fact, the National Wood Flooring Association (NWFA) reports that many flooring failures stem from poor installation rather than faulty materials. In other words, most flooring problems could have been avoided with better preparation.
The silver lining? Proper installation not only prevents headaches but also saves money. With repair costs for failed installations averaging around $1,500, taking the time to do it right is well worth it.
Simple steps go a long way: acclimate your hardwood planks for 3–7 days, maintain indoor humidity between 30% and 50%, and leave a ¼-inch expansion gap around the edges. These small measures ensure your floor stays in great shape for years to come.
For those in the Atlanta area, TriArt Hardwoods offers expert services for installation, refinishing, and repairs. Whether you’re starting from scratch or addressing an existing issue, their skilled team can help you achieve a long-lasting result.
FAQs
Do I need moisture testing if the subfloor feels dry?
Even if a subfloor feels dry to the touch, moisture testing is a must. Why? Because appearances can be deceiving. Testing ensures the moisture levels are consistent across the subfloor, safeguarding against problems like warping or buckling after installation.
Taking the time to test moisture is part of proper site preparation and plays a key role in ensuring hardwood floors remain durable and last for years. Skipping this critical step could lead to expensive repairs or replacements later on.
How do I know when hardwood is fully acclimated?
Hardwood is ready for installation once its moisture content aligns with both your subfloor and the indoor environment. This balance helps prevent issues like gapping or cupping later on. Generally, you’ll need to leave the wood in the installation area for about 48 to 72 hours, following the manufacturer’s recommendations. To be sure the wood has reached the proper equilibrium moisture content, use a moisture meter to check before beginning the installation process.
When should I use a moisture barrier on concrete?
When installing hardwood flooring over concrete, it’s crucial to include a moisture barrier to guard against potential damage from moisture. Use a vapor barrier, such as 6 mil poly, and lay it over the concrete slab. Make sure to overlap the seams by at least 6 inches, securing them firmly with tape. For complete protection, extend the barrier slightly up the walls to create a sealed environment that keeps moisture at bay and ensures the flooring stays protected over the long term.


