

Hardwood floors can last for decades if you care for them the right way. Regular cleaning, the right tools, and quick action on spills can prevent damage, save you money, and keep your floors looking great. Here’s a quick guide:
- Daily Cleaning: Sweep or vacuum with a soft-bristle brush to remove dirt and grit that can scratch the surface. Use a microfiber mop for fine dust.
- Weekly Deep Cleaning: For sealed floors, clean with a damp microfiber mop and a pH-neutral cleaner. For unsealed floors, avoid water and use solvent-based cleaners.
- Spill Management: Blot spills immediately to prevent stains or warping. Use the appropriate cleaner based on your floor’s finish.
- Damage Prevention: Use furniture pads, rugs with non-slip pads, and mats at entryways. Maintain indoor humidity between 35%–55% to avoid warping or gaps.
- Periodic Maintenance: Recoat high-traffic areas every 3–5 years. For severe wear, refinishing may be needed, costing $3–$8 per square foot.
How To Clean Wood Floors Like A Pro
sbb-itb-9f8f869
Tools You Need for Hardwood Floor Maintenance
Having the right tools can make a big difference in protecting your hardwood floors from scratches and wear. The good news? You don’t need to splurge on high-end equipment – just a few reliable tools can help maintain that polished look.
Microfiber Mops and Dusters
Microfiber mops and dusters are a must-have for hardwood floors. These tools are designed with tiny synthetic fibers that grab dust, dirt, and pet hair from between floorboards, rather than spreading it around. As Bob Vila explains:
"The best mop for wood floors is usually one with a large, flat head affixed with a microfiber cloth pad… These mops have pads with tiny synthetic fibers that reach into the grooves of wood floors to pick up and hold dust without scratching the wood".
Unlike traditional mops that can leave streaks or excess water, microfiber absorbs more liquid and dries quickly – reducing moisture exposure that could warp your floors. Plus, they’re economical: a set of machine-washable pads costs under $15 and can handle hundreds of washes. For a complete setup, consider the Rubbermaid Reveal Spray Mop Floor Cleaning Kit, which includes bottles and three pads for $41.49.
Vacuum Cleaners with Bare Floor Settings
If you prefer vacuuming, make sure to use a floor-brush attachment and turn off the beater bar. While the rotating brush is great for carpets, it can cause dents and scratches on wood. Bob Vila cautions:
"If your preferred mode of dust busting is vacuuming, use a floor-brush attachment and avoid the beater bar – its rotating brush can dent wood floors".
Vacuum cleaners are especially effective at reaching the crevices between floorboards, where dust often collects beyond the reach of a broom. Look for a vacuum with a dedicated bare floor setting to ensure it won’t damage your floor’s finish.
pH-Neutral Hardwood Floor Cleaners
Stick to pH-neutral cleaners to protect your floor’s finish. These products are specifically designed to clean dirt and grime without stripping the protective polyurethane or urethane coating. They’re also free of waxes and petroleum, which can leave behind residues that dull your floor’s shine over time.
Avoid acidic cleaners like undiluted vinegar or lemon juice, as they can erode the finish. Similarly, steer clear of alkaline products like bleach or ammonia, which are too harsh for wood. A safe DIY option? Mix a few drops of natural dish soap into a gallon of warm water. Most pH-neutral hardwood cleaners cost less than $25.
Before starting, identify your floor’s finish type. Drop a small amount of water on an out-of-the-way area. If the water pools, you have a surface finish (like polyurethane) that’s safe for water-based cleaners. If it soaks in, your floor likely has a penetrating finish (oil or wax), which requires solvent-based cleaners.
Daily Cleaning Routine
Keeping your hardwood floors clean every day is key to maintaining their appearance and durability. Dust and grit, if left unchecked, can damage the finish over time. By removing dirt promptly, you can protect your floors from scratches and wear.
High-traffic areas like entryways, kitchens, and hallways are especially vulnerable. Dirt and debris in these spots can act like sandpaper underfoot. Mary Gagliardi, an in-house scientist and cleaning expert for Clorox, explains that "the more foot traffic, the faster dirt, grime, and pet hair build up on your floors". Daily cleaning not only prevents this buildup but also helps maintain your floor’s natural shine.
Sweeping or Vacuuming
Begin by sweeping or vacuuming areas with heavy foot traffic every day. If you’re using a broom, choose one with synthetic fiber bristles. These bristles are better at trapping dust and prevent particles from being redistributed. Always sweep in the direction of the wood grain to lift debris from the grooves between boards.
Vacuuming is another effective option, especially for getting rid of dust in the crevices where floorboards meet. Use a hard floor setting or a soft-bristle brush attachment, and make sure the beater bar is turned off to avoid causing dents or scratches. For homes with children or pets, this step is particularly helpful in managing the extra mess.
Dusting with Microfiber
After sweeping or vacuuming, go over the floors with a dry microfiber mop or cloth. Microfiber’s tiny synthetic fibers are excellent at grabbing fine dust particles, even from the grooves between floorboards, rather than just pushing dirt around. Pay close attention to the seams where boards meet, as these areas often trap dust.
To further minimize dirt, place mats at all entryways and consider a shoes-off policy inside your home. A quick pass with a microfiber mop each day not only keeps your floors looking polished but also makes weekly deep cleaning much easier. This simple habit helps ensure your floors stay in great shape for years to come.
Weekly Deep Cleaning Steps
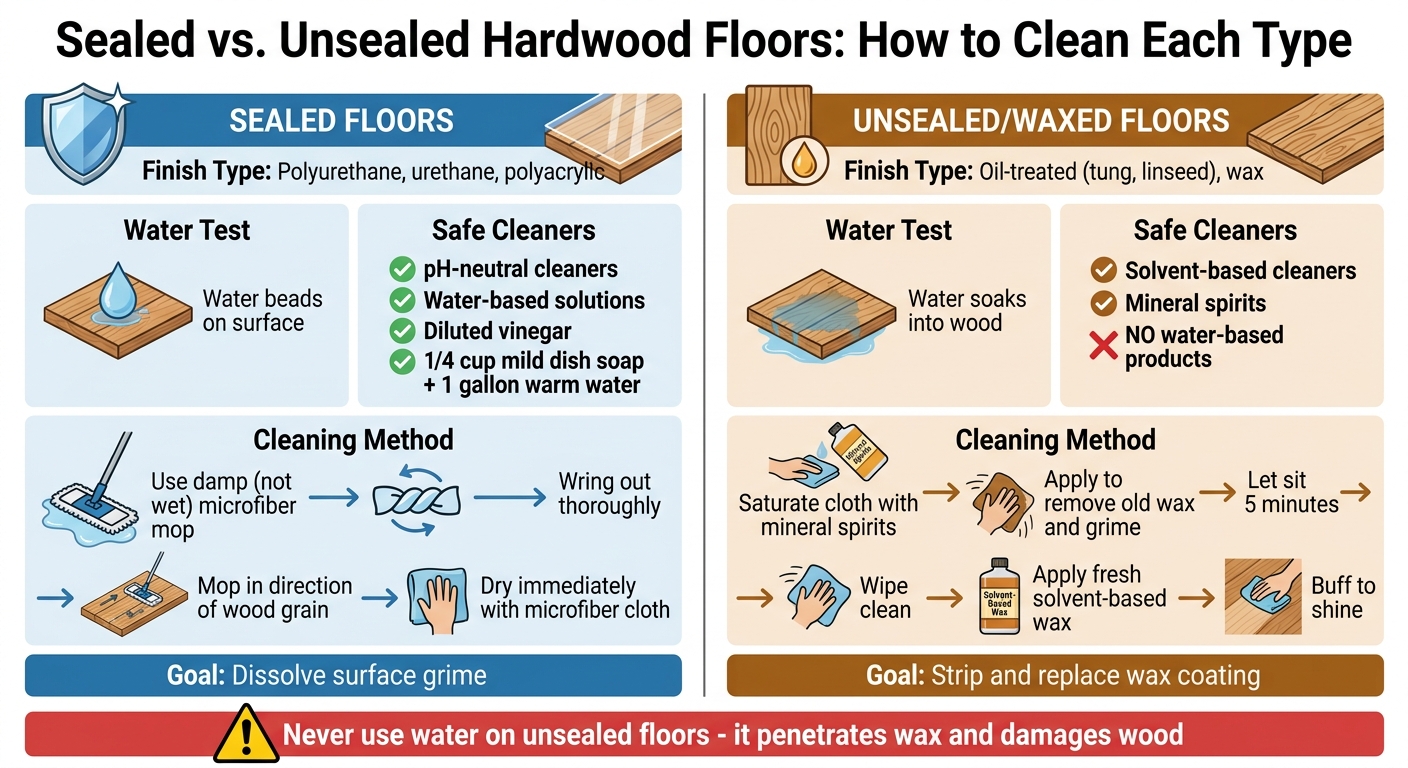
Sealed vs Unsealed Hardwood Floors: Cleaning Methods Comparison
Keeping hardwood floors clean and polished requires weekly deep cleaning. The method you use depends on whether your floors are sealed or unsealed, as each type reacts differently to moisture.
Sealed floors are coated with a protective layer, such as polyurethane or urethane, that makes them waterproof. To check if your floor is sealed, place a drop of water on it – if it beads up, the floor is sealed. These floors can be cleaned with water-based, pH-neutral cleaners. Unsealed floors, on the other hand, are typically treated with oil or wax and absorb water, making them prone to damage if exposed to moisture. Instead, they require solvent-based cleaners and should avoid water entirely to prevent warping. Start by vacuuming thoroughly to remove dirt and grit before applying any cleaning solution.
Vacuuming and Prepping the Floor
Begin by vacuuming the entire floor using a floor-brush attachment. Make sure to turn off the beater bar to avoid scratching the surface. This step removes debris and dust that could scratch the wood or interfere with the cleaning process.
Pay close attention to corners, baseboards, and areas under furniture, as these spots tend to collect more dust. Once the floor is free of loose dirt, you can move on to mopping or using a solvent-based cleaner, depending on your floor type.
Using a Damp Mop with pH-Neutral Cleaner
For sealed floors, mix 1/4 cup of mild dish soap with 1 gallon of warm water. Use a microfiber mop dampened with this solution, ensuring it’s wrung out thoroughly – only slightly damp, not dripping. Beth Sullivan, Founder & Editor-in-Chief of Practical Home Guides, advises:
"The golden rule of mopping hardwood is this: damp, never wet. A soaking wet mop is the fastest way to damage hardwood floors".
Mop in the direction of the wood grain for even cleaning and to avoid streaks. Work in small sections, about 3 feet at a time, to limit moisture contact. If the mop becomes too wet during cleaning, wring it out again before continuing.
For unsealed or waxed floors, avoid water entirely. Instead, use mineral spirits to clean the surface. Saturate a cloth with mineral spirits to remove old wax and grime. Let it sit for five minutes, then wipe clean. After cleaning, apply a fresh coat of solvent-based hardwood floor wax and buff it to restore shine.
| Feature | Surface-Sealed Floors | Penetrating/Unsealed/Waxed Floors |
|---|---|---|
| Finish Type | Polyurethane, urethane, polyacrylic | Oil-treated (tung, linseed), wax |
| Water Reaction | Beads on the surface | Soaks into the wood |
| Safe Cleaners | pH-neutral, water-based, diluted vinegar | Solvent-based cleaners, mineral spirits |
| Deep Clean Goal | Dissolve surface grime | Strip and replace wax coating |
Drying the Surface Immediately
After mopping, dry each section immediately with a clean, dry microfiber cloth. This step prevents moisture from seeping into the wood, which could cause warping, especially on unsealed floors. Drying also helps maintain a streak-free, polished look.
Even for sealed floors, standing water should be wiped up right away to avoid dulling the finish over time. Working in small sections makes it easier to dry each area thoroughly before moving on, ensuring your hardwood floors stay in excellent condition.
How to Handle Spills and Spot Cleaning
Spills – whether it’s coffee or a pet accident – need quick attention. Alicia Sokolowski, President and Co-CEO of AspenClean, emphasizes:
"For stains, the best thing is to wipe them right away so they don’t settle onto the wood".
When liquid lingers on hardwood, it increases the risk of stains, warping, or damage to the finish.
Blot Spills Immediately
Start by blotting the spill with a soft, dry cloth. Avoid wiping or rubbing, as this can spread the liquid further. Prolonged exposure allows water to seep into the seams, which could harm the finish. Pet urine, in particular, needs fast action since its acidity can cause permanent stains and damage. After blotting, tailor your cleaning approach to your floor’s finish.
Spot Cleaning Sealed Floors
If your floor has a sealed finish, follow these steps after blotting:
- Use a microfiber cloth lightly dampened with a pH-neutral hardwood cleaner. Make sure the cloth is wrung out thoroughly so it’s barely damp.
- Wipe the spot gently, moving in the direction of the wood grain.
- For stubborn residue, dampen the cloth with cleaner, let it sit on the spot for 10–20 seconds, and then wipe along the grain.
For dried-on food or sticky messes, gently scrape it off with the edge of a plastic knife. Afterward, dab the area with a damp cloth and finish by drying it completely with a clean towel.
Spot Cleaning Unsealed Floors
Unsealed or waxed floors require extra care, as they absorb water more easily. Beth Sullivan, Founder and Editor-in-Chief of Practical Home Guides, advises:
"Waxed floors should never be cleaned with water-based cleaners, as the water can penetrate the wax and damage the wood underneath".
For sticky spots or scuffs, dampen a soft cloth with mineral spirits and apply it gently. Then, wipe the area with a fresh, dry microfiber cloth. If you’re dealing with something stubborn, like gum or wax, cover it with ice until it hardens. Once brittle, gently scrape it off with a plastic spatula.
How to Prevent Damage and Maintain Your Floors Long-Term
Taking care of your hardwood floors goes beyond regular cleaning. Small, proactive steps can keep them looking great and protect them from wear over time. One of the biggest culprits of floor damage is abrasive debris. To combat this, try a two-mat system at your entryways: place a rough mat outside to catch larger debris and a softer mat indoors to trap finer particles before they reach your floors.
Using Furniture Pads and Rugs
Furniture can be tough on hardwood, but felt pads under furniture legs can make a big difference. These pads should be replaced every six to twelve months to avoid grit buildup, which can scratch the surface. If you use a desk chair, swap out hard plastic wheels for soft rubber ones specifically designed for hardwood floors. When it comes to rugs, steer clear of those with rubber or latex backs – they can trap moisture and discolor the wood. Instead, opt for breathable, non-slip pads that are hardwood-safe. These small adjustments go a long way in protecting your floors.
Maintaining Proper Humidity Levels
Hardwood floors are sensitive to changes in moisture. They expand when exposed to high humidity and contract when it’s dry, which can lead to warping, gaps, or cracks. To keep your floors stable, maintain indoor humidity levels between 35% and 55% and temperatures between 60°F and 80°F. A hygrometer is a handy tool for monitoring humidity. You might also need a humidifier during winter and a dehumidifier in the summer. Running your HVAC system consistently can also help minimize dramatic fluctuations that might stress the wood.
Polishing and Professional Refinishing
Over time, high-traffic areas can lose their shine. Recoating these spots every three to five years can restore their protective finish. This process involves light buffing followed by a fresh coat of polyurethane and can usually be done in just one day. For more severe damage, a full refinishing – sanding down to the bare wood – may be necessary. This typically costs between $3 and $8 per square foot. Companies like TriArt Hardwoods specialize in refinishing and repairs, offering solutions for both routine upkeep and more extensive restoration work.
Conclusion
Maintaining the beauty of hardwood floors isn’t just about cleaning – it’s about consistency and using the right techniques. Daily cleaning helps remove grit that can scratch the surface, while weekly routines and quick responses to spills keep your floors looking their best. It’s crucial to manage moisture levels carefully and steer clear of harsh chemicals like vinegar or ammonia, which can damage the protective finish.
Preventive measures also make a big difference. Simple habits like placing felt pads on furniture, using entryway mats, and keeping indoor humidity between 35% and 55% can protect floors from scratches, dents, and warping. Acting quickly to blot up spills prevents liquids from seeping in, which can cause staining or buckling.
If your regular cleaning efforts aren’t enough to restore your floor’s shine, it might be time to call in the professionals. TriArt Hardwoods offers services like deep cleaning to remove embedded dirt, screen-and-recoat treatments to refresh finishes, and full refinishing for more serious damage. Their team can also handle issues like water-damaged boards and deep scratches that DIY methods can’t fix.
Whether your floors need routine care or a complete overhaul, professional help can ensure they stay beautiful for years to come. Reach out to TriArt Hardwoods for a consultation and discover the best solutions tailored to your home’s needs.
FAQs
How do I know if my hardwood floor is sealed or unsealed?
To figure out if your hardwood floor is sealed, try the water test. Just place a few drops of water on the surface. If the water beads up and remains on the surface, your floor is sealed. However, if the water soaks in quickly or causes a stain, it’s likely unsealed or unfinished. This quick method can help you determine the type of finish on your floor.
What should I do if my hardwood floor gets water under the boards?
If water seeps under your hardwood floorboards, it’s important to act fast to minimize damage. First, locate the source of the water and determine how much of the flooring is affected. Carefully remove the damaged boards or lift the flooring to allow the area to dry thoroughly, which can help prevent mold growth. Replace any boards that are beyond repair, or fix sections with minor rot. If the damage is extensive, consider reaching out to a professional to restore your flooring and prevent future issues.
How can I tell if my floor needs a recoat or a full refinish?
To figure out whether your floor needs a recoat or a full refinish, start by evaluating its condition. If you notice minor issues like light dullness or surface-level scratches, a recoat might be enough. This process involves adding a fresh topcoat without the need for sanding. However, if the damage is more severe – such as deep scratches, discoloration, or a finish that’s worn down – a full refinish is likely the better choice. This involves sanding the floor down and applying new stain and finish to bring it back to life.


