

Hardwood flooring is a major investment, and preparation is everything. Skipping steps can lead to warped boards, voided warranties, or costly repairs. Here’s what you need to know before starting:
- Inspect Materials: Installation means acceptance. Check for visible defects before nailing or gluing.
- Control the Environment: Keep temperatures between 65°F and 85°F and humidity at 30%-50% for at least a week beforehand.
- Check Subfloor: Ensure it’s clean, dry, and level. Moisture content must be tested to avoid future warping.
- Acclimate the Wood: Let the flooring adjust to the room’s conditions for a few days to prevent gapping or cupping.
- Prepare the Jobsite: Finish all “wet” work (like painting), confirm utilities are working, and clear the space for installation.
Proper planning ensures a durable, long-lasting floor. Read on for detailed steps to avoid common pitfalls and protect your investment.
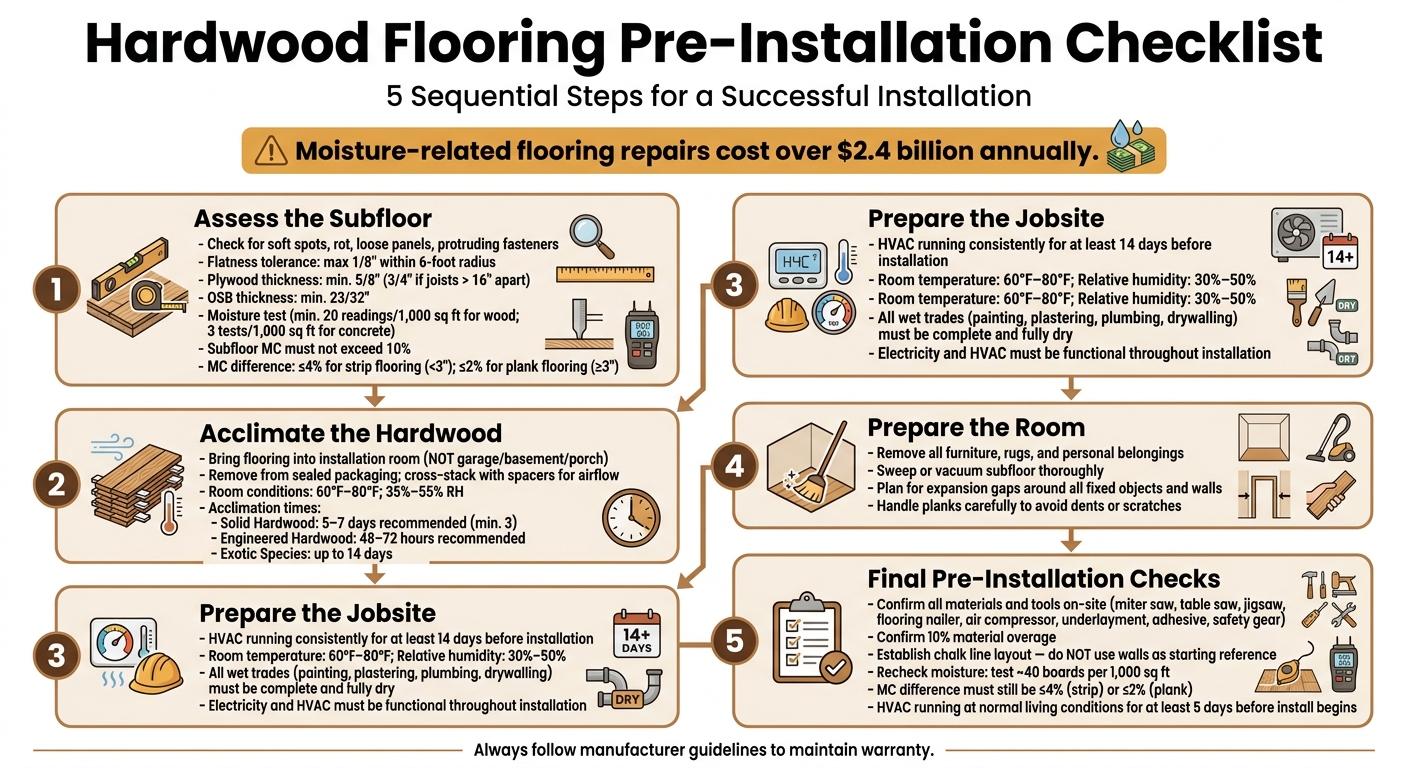
Hardwood Flooring Pre-Installation Checklist: Step-by-Step Guide
Prepping Your Subfloor for Hardwood | How to Prepare for Wood Floor Installation
sbb-itb-9f8f869
1. Assessing the Subfloor
After completing the necessary pre-installation steps, the next critical phase is evaluating the subfloor. A secure and level subfloor is essential for a successful hardwood flooring installation.
Check Subfloor Condition
Start by inspecting the entire subfloor for any issues like soft spots, rot, loose panels, or protruding fasteners. If you encounter squeaky or shifting wood panels, secure them with decking screws or ring-shank nails to ensure stability.
Flatness is just as important as stability. Use a long straightedge to identify high spots or dips. For glue-down installations, the surface should not vary more than 1/8" within a 6-foot radius. High points can be sanded smooth, while low areas should be filled with a Portland-based leveling compound. For dips deeper than 1/2", embed lath into the compound to add strength.
The type of subfloor material also determines your installation options. Plywood must be at least 5/8" thick (or 3/4" if joists are spaced more than 16 inches apart), while OSB should be 23/32" thick. Particleboard, however, is unsuitable for nail-down installations because it cannot hold fasteners securely.
"The industry mantra is that all subfloors should be clean, dry and flat before wood flooring goes down." – Catherine Liewen, Wood Floor Business
If the subfloor includes old vinyl tiles – especially the 9×9 tiles common before the 1980s – avoid sanding or scraping them. These tiles may contain asbestos, which requires professional removal.
Moisture Testing
Moisture is one of the biggest threats to hardwood flooring. Excess moisture can cause warping, cupping, or, in the case of engineered wood, delamination. Testing for moisture is a non-negotiable step.
For wood subfloors, use a pin-type or pinless moisture meter. The NWFA recommends taking at least 20 readings per 1,000 square feet. The moisture content (MC) of the subfloor should not exceed 10%, and the difference between the subfloor MC and the hardwood flooring MC should be no more than 4% for strip flooring (under 3 inches wide) or no more than 2% for plank flooring (3 inches or wider).
For concrete subfloors, in-situ relative humidity (RH) probe testing, following ASTM F2170 standards, is the preferred method. This technique measures the moisture inside the slab rather than just on the surface. Conduct 3 tests per 1,000 square feet. Newly poured concrete slabs should dry for at least 60 days before installing hardwood flooring.
No matter which method you use, document everything. Record each reading, take photos, and mark test locations on a floor plan. As certified wood flooring inspector Timothy McCool emphasizes:
"Without documentation, it’s like not having done the test at all."
Subfloor Repairs and Leveling
Fix any identified issues with the subfloor before moving forward. Secure loose or squeaky panels, sand or plane high spots, and fill low areas with leveling compound.
For more significant structural problems – like a joist sitting 3/4" higher than others – surface fixes won’t suffice. In such cases, cut around the joist, plane it down, reinforce the area with 2×6 nailers, and patch the space with new 3/4" plywood. While this approach requires extra effort, it ensures a smooth, even surface for your hardwood floor.
If you’re working with a concrete subfloor, confirm it has a compressive strength of at least 3,000 psi for glue-down installations. To check quickly, drag a nail across the surface. If it leaves a visible groove, the concrete may be too soft for this method.
Once the subfloor is stable, level, and moisture-free, you can proceed to the next step: acclimating the hardwood flooring materials.
2. Acclimating Hardwood Materials
After evaluating and repairing the subfloor, it’s time to let your hardwood flooring adjust to its new surroundings. Wood naturally reacts to the moisture in the air, so skipping this step can cause problems like gapping (boards pulling apart), cupping (edges lifting higher than the center), or buckling, where planks completely detach. Proper acclimation is a must before moving on to jobsite preparation.
Unpack and Store Materials
Start by bringing the hardwood into the room where it will be installed – not a basement, garage, or porch. Make sure the space is enclosed and that the HVAC system has been running for at least five days before the flooring arrives. This ensures the environment reflects typical living conditions.
Once the materials are in the room, remove them from their sealed packaging. Plastic wrap can trap moisture, preventing the wood from properly adjusting. For the best results, take the planks out of their boxes entirely and stack them in a cross-stacked, log-cabin style with spacers between layers to allow airflow. If you need to keep them in boxes, at least open both ends and stagger the stacks. Be sure to keep the wood elevated off the subfloor and away from exterior walls, as these areas may have different temperature and moisture levels than the rest of the room.
Check Material Quality and Quantity
While unpacking, inspect the flooring for any defects and check for color consistency across the lot. This is also the time to confirm that you have at least a 10% overage to account for cuts, waste, and potential repairs. Addressing shortages now will save you from delays during installation.
Acclimation Timing
The amount of time needed for acclimation depends on the type and species of wood, as well as the difference between the moisture content of the planks and the room:
| Flooring Type | Min. Acclimation Time | Recommended Time | Max MC Differential (vs. Subfloor) |
|---|---|---|---|
| Solid Hardwood | 3 days | 5–7 days | 2% |
| Engineered Hardwood | 48 hours | 48–72 hours | 4% |
| Exotic Species | – | Up to 14 days | 2% |
Keep the room temperature between 60°F and 80°F, with relative humidity maintained between 35% and 55%. Use a hygrometer to track the room’s conditions and a moisture meter to check the wood. Relying solely on time is not enough – moisture levels must stabilize before acclimation is complete.
"Time alone does not determine acclimation. Moisture content does. Until readings stabilize, acclimation has not occurred." – Travis Bjorkman, Principal Scientist for Wood, AHF
Always consult the manufacturer’s guidelines for your specific hardwood product. Requirements can vary depending on the wood species, grade, and local climate. Following these guidelines is often necessary to maintain your warranty. Once acclimation is complete, you’re ready to prepare the jobsite for installation.
3. Preparing the Jobsite
With the wood properly acclimated, the next step is to prepare the jobsite. Even if the flooring is ready, an unstable environment can still create problems on installation day.
Set Temperature and Humidity
Once acclimation is complete, make sure the jobsite maintains the right climate for installation. The room should reflect typical living conditions, with indoor temperatures between 60°F and 80°F and relative humidity levels ranging from 30% to 50% throughout the year.
"Relative humidity in the building should be between 30–50 percent year-round for optimal wood flooring performance. Temperatures should be kept between 60° and 80° Fahrenheit." – Olde Wood Ltd.
To achieve this, ensure the HVAC system has been running consistently for at least 14 days prior to installation. A hygrometer is a reliable tool to check that the temperature and humidity are within the recommended range.
Confirm Wet Trades Are Done
Moisture from activities like painting, drywalling, plastering, and plumbing can disrupt the wood’s moisture balance. Hallmark Floors highlights this critical step:
"All concrete, masonry, plastering, and other ‘wet’ work must be complete and thoroughly dry."
Before moving forward, confirm that all wet trades have been finished and fully dried. Additionally, wall coverings and most painting should also be completed. This ensures the site is dry and ready for the next phase.
Confirm Utilities Are Working
Electricity and HVAC systems are not optional during installation – they are vital. Power is required for operating tools, and HVAC systems must remain on to maintain stable conditions. Ensure all utilities are functional and accessible before starting. Any HVAC failure or power outage during installation can jeopardize the flooring’s integrity.
4. Room Preparation
Once the jobsite conditions are confirmed to be suitable, it’s time to get the room ready for a smooth installation process. Proper preparation not only speeds things up but also ensures the work is safer and cleaner.
Clear the Room
Start by removing everything from the room – furniture, rugs, décor, and any personal belongings. This step is crucial for laying out straight chalk lines, which are key to a precise installation. If any fixed objects remain, remember that expansion gaps must be left around their edges. The fewer obstacles in the space, the easier it is to maintain these gaps. After clearing the room, thoroughly sweep or vacuum the subfloor to eliminate any debris that might cause unevenness or imperfections.
Protect Surrounding Areas
To safeguard the areas around the installation site, handle the hardwood planks with care to prevent any dents or scratches. Once the planks are installed, add trim and moldings. These not only cover the required expansion gaps but also give the room a clean, finished look.
5. Final Pre-Installation Checks
Before you start installing hardwood floors, take a moment to double-check everything. These final steps can save you from costly mistakes down the road.
Review Materials and Tools
Even if you’ve already prepared, now’s the time to ensure everything you need is on-site and ready to go. This includes hardwood planks, underlayment (such as rosin paper, felt paper, or a moisture barrier), fasteners, and adhesives if required. For tools, make sure you have:
- A miter saw for crosscuts
- A table saw for rip cuts (especially for the first and last rows)
- A jigsaw for notches and curves
- A jamb saw or oscillating multi-tool for trimming door casings
If you’re fastening the floor, a pneumatic flooring nailer paired with an air compressor will save you time and effort compared to a manual nailer. If you don’t own one, renting is a practical choice since buying a professional-grade nailer can cost between $200 and $600.
Here’s a quick reference table for essential items:
| Category | What to Confirm On Site |
|---|---|
| Safety | Safety glasses, N95 mask, ear protection, knee pads |
| Layout | Tape measure, chalk line, speed square, spacers, pencil |
| Cutting | Miter saw, table saw, jigsaw, jamb saw |
| Fastening | Flooring nailer, cleats/staples, air compressor, rubber mallet |
| Materials | Hardwood planks, underlayment, adhesive, wood putty |
| Cleanup | Shop vacuum, broom, dustpan |
Confirm Layout and Design
Before starting, review the planned layout with your installer. Pay attention to details like plank direction, transition placement, and how the floor will look from the main entry point.
One golden rule: don’t use a wall as your starting point. Walls are rarely perfectly square, which can cause rows to drift out of alignment.
"The aesthetics of the line are often more important than how square the flooring is to walls." – Stephen Diggins, Wood Floor Business
Instead, use a chalk line to establish a straight and reliable starting reference. Also, calculate how many rows will fit across the room. If the last row ends up being too narrow, adjust the starting line to balance the width of the first and last rows.
Once the layout is confirmed, shift your focus to the environmental conditions at the jobsite.
Recheck Temperature, Humidity, and Subfloor Conditions
Environmental factors can change, especially in new construction or with seasonal shifts. Make sure conditions remain stable and within recommended ranges. The HVAC system should have been running at normal living conditions for at least five days before installation begins.
Use a moisture meter to take final readings from both the hardwood and the subfloor. For accuracy, test about 40 boards per 1,000 square feet. Keep these moisture content guidelines in mind:
- For solid strip flooring under 3" wide, the wood and subfloor moisture content difference should be no more than 4%.
- For wide-plank flooring (3" or wider), the difference should be 2% or less.
"The right amount of acclimation is based on the moisture level readings at the time of installation, not on how long the floor is acclimated." – Weles Team
If readings are unstable, don’t rush. Delaying the installation by a day or two is far better than risking issues later. After all, moisture-related repairs cost over $2.4 billion annually. A little patience now can save you a lot of trouble later.
Conclusion
Installing hardwood floors successfully doesn’t begin with laying the first plank – it starts weeks in advance. Each step, from checking subfloor moisture levels to planning your layout, plays a crucial role in ensuring your floors look great and last for years.
As Andrey Sashchenkov of McMillan Floors puts it: "The long-term performance of your floor depends heavily on proper installation, – from subfloor preparation to final trim." Skipping essential steps like moisture testing or acclimating the wood can lead to issues like warping, cupping, or gapping, which can result in expensive fixes.
FAQs
How do I know my subfloor is dry enough for hardwood?
Before installing hardwood flooring, it’s crucial to measure the moisture content of the subfloor and compare it to the hardwood. The subfloor’s moisture level should be within 2% of the hardwood’s moisture content, which typically falls between 6% and 10% (with a maximum of 12%). For solid strip hardwood, the acceptable difference increases slightly but should not exceed 4%. Following these guidelines helps avoid issues like warping or buckling after the flooring is in place.
What’s the fastest safe way to acclimate hardwood flooring?
The quickest and safest way to prepare hardwood flooring for installation is to allow it to acclimate to your home’s environment for 48–72 hours. Place the flooring – still in its unopened packaging – in the room where it will be installed. Make sure the temperature and humidity levels in the room stay consistent during this time. This process helps the wood adjust to the proper moisture content, minimizing the chances of issues like gapping, cupping, or buckling once installed.
What should I do if my home’s humidity isn’t in range yet?
Before installing hardwood flooring, make sure the humidity in the space is within the right range. This step is crucial because hardwood needs time to adjust to its environment to avoid problems like gapping or cupping later on.
Keep the relative humidity between 30-50% and maintain a temperature of 60°-80°F. Once these conditions are consistent, let the flooring acclimate for at least three days, or until its moisture content stabilizes. This preparation helps ensure a smooth and long-lasting installation.


