
Refinishing hardwood floors can restore their beauty, protect them from damage, and extend their lifespan – all without the cost of a full replacement. Whether your floors are scratched, dull, or showing signs of wear, refinishing is an effective solution. Here’s what you need to know:
- Why Refinish? It removes scratches, dents, and wear while adding a protective layer to prevent future damage. Polished floors can also increase home value.
- Refinishing Methods:
- Screen-and-Recoat: Ideal for light scratches or dull surfaces, this process is quicker and less invasive.
- Full Sanding: Necessary for deep damage, discoloration, or changing the wood’s color.
- Process Overview: Sanding removes old finishes, followed by staining (optional) and applying multiple coats of protective finish.
- Tools & Materials: Drum sanders, edgers, safety gear, and polyurethane finishes are key. Costs for materials and tools vary, with rentals starting at $60/day.
- Local Considerations: In Johns Creek‘s humid climate, maintaining indoor humidity (35%-55%) is critical for refinishing success.
- Maintenance Tips: Regular sweeping, using felt pads on furniture, and avoiding harsh cleaners will keep your floors in great shape.
For professional results, companies like TriArt Hardwoods offer dustless sanding, custom staining, and eco-friendly finishes tailored to Johns Creek homes. Whether you DIY or hire experts, refinishing can transform your floors and protect your investment.
Refinishing Hardwood Floors // START TO FINISH
sbb-itb-9f8f869
Evaluating Your Floors Before Refinishing
Take a good look at your floors before diving into a refinishing project. Not every dull or worn floor needs a full overhaul – sometimes, surface grime or a tired-looking topcoat can be refreshed with much less effort and cost.
When Your Floors Need Refinishing
Start with a simple water drop test: drip a bit of water on the floor. If it soaks in, the finish is gone. But if the water beads up and stays on the surface, your floor might just need a deep cleaning or a light screen-and-recoat instead of full sanding.
Pay attention to discoloration. Gray tones often mean early moisture damage, while black spots suggest deeper issues. Deep scratches that snag your fingernail, widespread gouges, or splintering wood are clear signs that full sanding is necessary. Severe splintering is a definite indicator that refinishing can’t be avoided.
If your floor looks dull, it might just be wax buildup. A professional deep clean can often restore shine without the need for sanding. Also, keep in mind that some store-bought cleaners can leave residue, making floors appear darker than they actually are.
Finally, check the wear layer thickness. You need at least 3mm (around 3/32 inch) of usable wood to sand safely without hitting the subfloor [9, 11].
Once you’ve assessed your floor’s condition, you’ll be able to decide whether a light screen-and-recoat will do the job or if full sanding is required.
Choosing Between Full Sanding and Screen-and-Recoat
After evaluating the damage, pick the approach that works best for your floor. A screen-and-recoat (also called buff-and-coat) is a lighter process that involves scuffing the existing finish with a buffer and applying a new protective topcoat. This is ideal for minor surface scratches, dull spots in high-traffic areas, or light scuffing – as long as the underlying finish is mostly intact [10, 12]. It doesn’t remove any wood, creates very little dust, and can usually be completed in a single day. Plus, it adds another 3 to 5 years of protection.
On the other hand, full sanding removes the old finish and a thin layer of wood. This is essential for dealing with deep gouges, pet stains, or when you want to change the floor’s color [10, 11]. The trade-offs? It’s a dustier process (over 50 pounds of dust per 1,000 square feet without proper containment), takes longer (3 to 5 days including curing), and costs more. But the results last much longer – typically 7 to 10 years [9, 11].
Big Bro Hardwood sums it up perfectly:
A teaspoon of water that soaks in within ten seconds and deep cross-grain scratches both show the finish is gone and full wood floor refinishing – not just polishing – is required.
Still unsure? Test an inconspicuous spot, like a closet or under furniture, to see how your floor responds before committing to a full-scale project.
Tools and Materials You’ll Need
If you’re tackling hardwood floor refinishing in Johns Creek, having the right tools and products is a must. The proper equipment not only simplifies the job but also ensures your work is safer and more effective. You’ll need tools for sanding, safety gear to protect yourself, and quality products to seal and finish your floors.
Essential Refinishing Tools
The key pieces of equipment include a drum sander for large areas, an edger for tight spots like corners and baseboards, and an orbital buffer for the final smoothing process. Most homeowners rent these tools from places like Home Depot, where rental costs are approximately $60 per day or $160 to $270 per week. If you’re new to refinishing, an orbital sander might be a better choice than a drum sander – it’s slower but much easier to control, reducing the risk of damaging your floors.
Safety gear is non-negotiable. You’ll need an N95 respirator to protect against fine wood dust, safety goggles to shield your eyes, ear protection for the noisy equipment, and knee pads for comfort during extended work sessions. Other necessary hand tools include a nail set to recess any protruding nails, a putty knife, a pry bar for removing molding, and a shop vacuum with a HEPA filter for thorough cleanup. For applying stain and finish, have lamb’s wool applicators, foam rollers, natural bristle brushes, and paint trays ready.
Choosing the right sandpaper grits is crucial for a smooth finish. Start with 36 to 40 grit to remove old finishes and deep scratches, transition to 60 to 80 grit for smoothing, and finish with 100 to 120 grit before buffing. Avoid skipping more than one grit level at a time to prevent visible scratches. On average, sanding removes about 0.75 mm to 1 mm of the wood surface.
With the right tools in hand, you’ll be set up for efficient, precise work. Next, it’s all about selecting the best finishing products.
Stains, Sealants, and Finishes
When it comes to finishes, matte and satin options are popular for their ability to hide dust, scratches, and footprints better than high-gloss finishes. Flooring America highlights:
Subtle finishes, such as matte and satin, are taking center stage, offering a sophisticated look that feels both modern and timeless.
For sealing, polyurethane is the go-to choice for its moisture resistance. Water-based polyurethane is low in VOCs, dries quickly (2 to 4 hours per coat), and remains clear over time. On the other hand, oil-based polyurethane provides a warm amber tone and handles heavy foot traffic well, but it takes longer to dry – 12 to 24 hours per coat – and requires good ventilation due to its higher VOC content. In Johns Creek’s humid climate, allow at least 24 hours between coats; high humidity may extend drying times.
Expect to spend $27 to $40 per gallon for stain, while finish coats can cost between $165 and $360 for an average project. These products are available at local hardware stores, or you can check specialty suppliers like North Georgia Flooring Distributors or Panel Town & Floors. Always test stains in a small, inconspicuous area, like a closet or under furniture, to confirm the color and drying time before committing to the entire floor.
How to Refinish Hardwood Floors
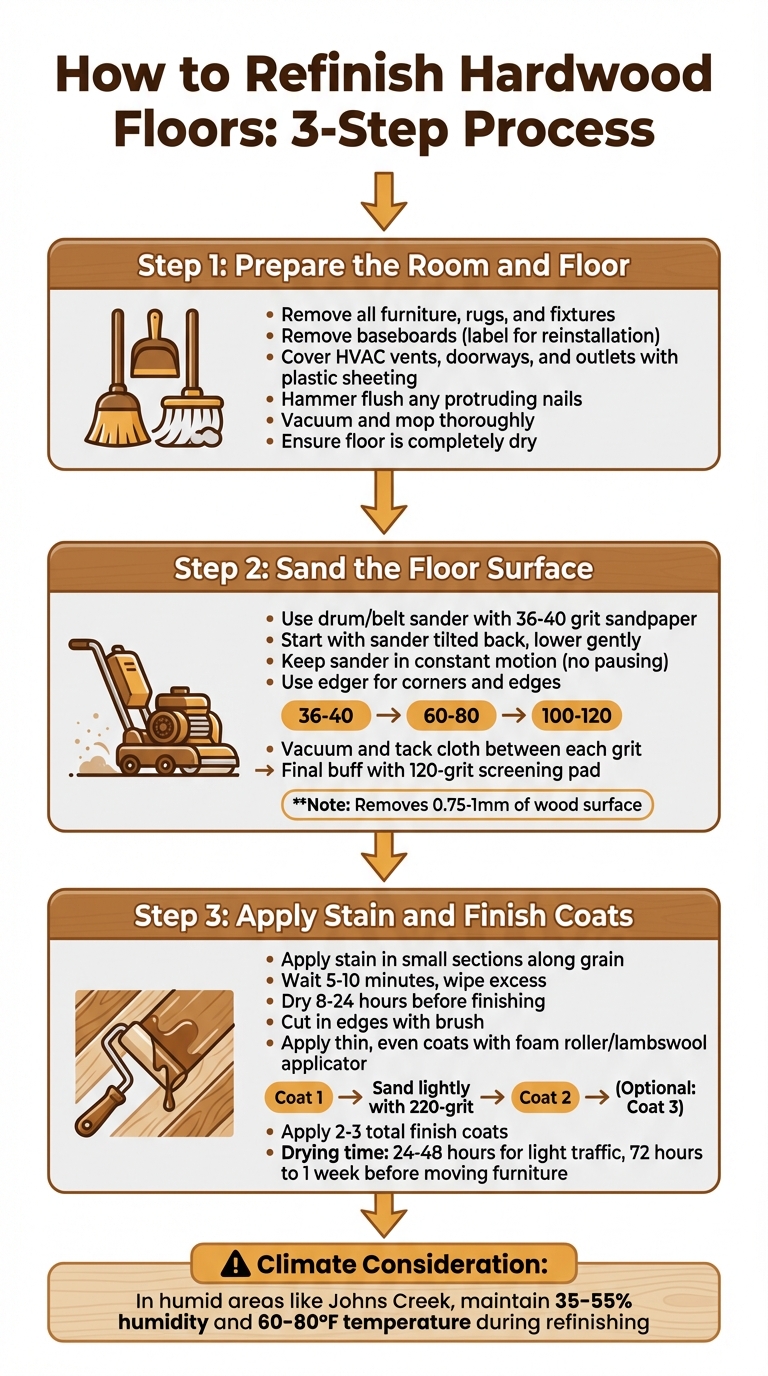
3-Step Hardwood Floor Refinishing Process Guide
Refinishing hardwood floors is a detailed, multi-day process that requires precision and patience. It involves three key stages: preparing the space, sanding the surface, and applying protective finishes. With the right approach, you can achieve a polished, long-lasting finish that looks like it was done by a pro.
Step 1: Prepare the Room and Floor
Start by clearing the space completely. Move out all furniture, rugs, and fixtures, and carefully remove baseboards, labeling them for easy reinstallation later. To keep dust contained, cover HVAC vents, doorways, and electrical outlets with plastic sheeting and tape.
Check for any nails sticking out of the floor and hammer them flush. Then thoroughly vacuum and mop the floor to remove dust and debris, ensuring it’s completely dry before moving on to sanding.
Step 2: Sand the Floor Surface
Use a drum or belt sander with 36–40-grit sandpaper to strip away the old finish and smooth out the surface. Always start with the sander tilted back, lowering it gently as you move forward to avoid gouges. Keep the sander in motion – pausing even briefly can leave noticeable divots.
For edges and corners, switch to an edger or orbital sander, using the same grit progression. Gradually work through finer grits (60–80, then 100–120), vacuuming and wiping with a tack cloth between each pass. Once the final sanding is complete, use a floor buffer with a 120-grit screening pad to blend the edges with the center and eliminate leftover scratches.
Step 3: Apply Stain and Finish Coats
Apply stain in small sections, always following the wood grain. Use an angled brush, foam pad, or lambswool applicator, and work with a wet edge to ensure even coverage. After 5–10 minutes, wipe off any excess stain. Let it dry for 8 to 24 hours before moving on to the finish.
For the finish, start by cutting in around the edges with a brush. Then, use a high-density foam roller or lambswool applicator to apply thin, even coats along the grain. Avoid puddles or drips by spreading the finish evenly. After the first coat dries, lightly sand with 220-grit sandpaper, then clean thoroughly with a vacuum and tack cloth. Apply one or two additional coats, allowing 24–48 hours for light foot traffic and 72 hours to a week before moving furniture back in.
Keep in mind that local conditions, such as humidity in areas like Johns Creek, can affect drying times and the performance of your materials. Adjust your schedule as needed to account for these factors.
Johns Creek Climate and Refinishing Factors
The humid subtropical climate in Johns Creek poses unique challenges for hardwood refinishing. Long stretches of high humidity, followed by abrupt cold fronts, can cause temperatures to plummet from 85°F to 55°F in just a few days. These rapid changes lead to significant moisture shifts in the wood, complicating refinishing efforts.
Managing Humidity and Temperature
Wood behaves like a sponge, expanding when humidity rises above 55% and shrinking when it dips below 35%. For refinishing, you’ll want to maintain relative humidity between 35% and 55% and temperatures between 60°F and 80°F. Outside of this range, boards may warp, swell, or crack.
"Wood is a hygroscopic material, meaning that it reacts to moisture in the air, so humidity is enemy number one." – Onset’s HOBO Data Loggers
To keep conditions stable, use a hygrometer to monitor indoor humidity levels throughout the project. Running your HVAC system consistently – even when you’re not home – helps maintain the right environment. In humid spaces like basements, a dehumidifier can be a lifesaver to prevent moisture absorption. Fluctuations in temperature and humidity don’t just affect the wood; they can also disrupt the curing process for adhesives and finishes, leading to poor bonding or even finish failure.
These environmental factors also play a big role in how materials acclimate and when to schedule your refinishing project.
Material Acclimation and Project Timing
Timing is everything when it comes to refinishing. Allow all materials to acclimate for at least 48 hours before starting the project. This helps reduce wood movement and ensures the finish adheres properly. Spring and fall are the best times to refinish in Johns Creek, as these seasons typically offer more stable weather conditions.
"Before starting refinishing, let your hardwood floors acclimate to the room’s temperature and humidity for at least 48 hours. This will help prevent excessive wood movement and give the finish the best chance to adhere properly." – Carpets Unlimited
During summer, air conditioning or dehumidifiers can help prevent wood from swelling or finishes from bubbling. In winter, humidifiers are essential to keep wood from shrinking and to stop finishes from drying too quickly, which can cause cracking or hazy spots. Given Johns Creek’s high-moisture environment, oil-based polyurethane is a solid choice for its superior moisture resistance, lasting over 10 years compared to the 5-7 years of water-based options.
Caring for Your Refinished Floors
Even though your refinished floors might feel dry to the touch after 24 hours, they need up to 30 days to reach full chemical hardness. Hold off on moving furniture back for at least 3 to 7 days, avoid placing area rugs for 14 days, and steer clear of liquid cleaners during the first two weeks. Once the finish has fully cured, maintaining their appearance comes down to consistent daily care and seasonal upkeep.
Regular and Seasonal Maintenance
Start with daily sweeping using a soft-bristle broom or a microfiber dust mop. Tiny abrasive particles brought in from outside can wear down the finish over time. Entrance mats with dense piles are a game-changer – they can trap up to 80% of debris within just a few steps. For a deeper clean, vacuum once or twice a week using a hardwood-friendly setting without a beater bar. When it’s time to mop, microfiber mops are your best bet – they capture 99% more dirt than traditional cotton mops and require far less water. Stick to pH-neutral cleaners (pH 6.5–7.5) made specifically for hardwood floors, and steer clear of vinegar, ammonia, steam mops, or oil-based soaps, as they can damage the finish.
"Using store bought wax/oil/acrylic based cleaners and rejuvenator products will make your floors appear darker and unattractive over time." – Truman Hardwood Floor Restoration
Keep indoor humidity levels between 35% and 55% to prevent the wood from expanding or shrinking. A dehumidifier in the summer and a humidifier in the winter can help maintain this balance. If spills happen, blot them immediately with a microfiber cloth, starting at the edges and working inward to stop moisture from seeping into the wood grain.
Avoiding Damage to Your Floors
Taking a few extra precautions can go a long way in protecting your floors. Add 100% wool felt pads under all furniture legs and replace them every few months, as they tend to compress over time. In high-traffic areas, lay down area rugs with non-slip backings, but avoid those with rubber or latex backing, as they can trap moisture and stain the wood. Keep pet nails trimmed, and ask guests to remove high heels to minimize dents. Use curtains or blinds to reduce UV exposure, which can fade the wood over time. Lastly, place waterproof mats under pet food and water bowls to catch spills before they can damage the floor.
TriArt Hardwoods Refinishing Services

Professional Refinishing Solutions
TriArt Hardwoods offers refinishing services tailored specifically for Johns Creek homes. Their process starts with a detailed in-home consultation to assess your flooring and discuss your preferences. Within 24 hours, you’ll receive a clear proposal outlining the scope of work and costs. Using advanced dustless sanding equipment, they remove old finishes and imperfections without leaving your home covered in debris. After sanding, you can opt for staining to change the floor’s color, followed by multiple coats of a durable, eco-friendly sealant that protects against everyday wear and tear.
"Through meticulous sanding, staining, and sealing, we’ll unveil the inherent beauty of your hardwood floors, imbuing your home with a renewed sense of elegance and sophistication." – TriArt Hardwoods
Their services extend to refinishing hardwood stair treads and accommodate a variety of wood types commonly found in Johns Creek homes, like oak, maple, cherry, and walnut. Projects require a 50% deposit upfront, with the remaining balance due upon your final approval.
With their expertise and attention to detail, they ensure your floors look stunning and stand the test of time.
Skilled Work and Local Experience
TriArt Hardwoods combines modern techniques with local know-how to deliver high-quality results. Their team is deeply familiar with the construction styles and materials used in Johns Creek homes. In October 2025, Derek Anthony turned to TriArt Hardwoods to repair severe damage caused by a previous contractor. The team’s precise sanding and refinishing work exceeded his expectations, and he appreciated their clear communication and meticulous attention to detail. That same month, Brenda Karnes praised Hugo and his crew for doing what she called a "remarkable job" restoring her damaged floors.
"Our team of skilled craftsmen has years of experience in refinishing hardwood floors. We have the knowledge and expertise to handle any type of hardwood, ensuring that your floors are restored to their former glory." – TriArt Hardwoods
With a 4.5-star rating from 115 reviews, customers frequently commend the team for their professionalism, timeliness, and craftsmanship. Their process not only delivers excellent results but also respects your home by maintaining a clean and organized job site throughout the project.
Conclusion
Key Takeaways
Refinishing your hardwood floors can bring back their natural beauty, increase your home’s value, and protect them from everyday wear and tear. The process starts with assessing your floor’s condition to decide between full sanding for significant damage or a screen-and-recoat for lighter scuffs. For homes in Johns Creek, where humidity is a factor, finishes like oil-based polyurethane are a solid choice, offering long-lasting protection – sometimes over a decade.
Georgia’s humid climate demands careful maintenance. Keeping indoor humidity levels in check and using proper cleaning techniques are essential. A damp microfiber mop works well, but steer clear of wax-based cleaners to maintain the integrity of your refinished floors.
For those seeking professional help, TriArt Hardwoods provides top-notch refinishing services. They use dustless sanding technology and environmentally friendly products, ensuring both quality and convenience. Their process includes a personalized consultation, quick proposals within 24 hours, and a final walk-through with tips for ongoing care. With a 4.5/5 rating from 115 reviews, their expertise makes them a trusted choice for local homeowners.
Whether you hire professionals or take on the project yourself, understanding the refinishing process and how to handle the unique challenges of your local environment will help you achieve lasting results. Hardwood floors are a major investment, and refinishing them not only protects but also revitalizes your living space.
FAQs
How do I know if my floor can be sanded again?
To figure out if your hardwood floor can handle another round of sanding, start by examining its condition. Look for signs of wear, damage, and check the thickness of both the wood and its finish. These factors will help determine if there’s enough material left to sand without risking harm to the floor. For an accurate assessment, it’s best to consult a flooring professional. They can confirm whether sanding is a safe option without jeopardizing the floor’s durability.
Should I choose water-based or oil-based polyurethane here?
When deciding between water-based and oil-based polyurethane, it’s all about what you prioritize.
Water-based polyurethane dries quickly, has a milder odor, and keeps the wood’s natural color intact. However, it doesn’t hold up as well in terms of durability.
On the other hand, oil-based polyurethane offers better durability, stands up to wear and tear, and develops a warm, amber tone as it ages.
If you need a finish that dries fast and has minimal odor, water-based is your go-to. But for high-traffic areas or when durability is key, oil-based is the better choice.
How long until I can walk on the floors and move furniture back?
After refinishing your hardwood floors, give them 3 to 7 days before walking on them or moving furniture back into place. Even though the finish might feel dry after a day or two, it still needs extra time to fully cure and harden. To protect the surface and prevent scratches, make sure to attach felt pads under the legs of your furniture before setting anything back onto the floor.


